Scrake (Killing Floor 2)

The Scrake is a giant specimen in Killing Floor 2. It is classified as a large enemy, and is considered extremely high threat. Scrakes appear as muscular and huge humanoids, with a surgeon's mask over their face, in addition to a bloodied apron that they wear on their bodies. Their most distinctive feature is the nerve-controlled Chainsaw on their right arm, which they use to eviscerate their prey. Scrakes are relentless killing machines when enraged and are capable of dealing just as much punishment as they are able to take. Because of this, Scrakes are extremely dangerous and should not be engaged alone in a team game.
Base Statistics
| Normal | Hard | Suicidal | Hell on earth | |
|---|---|---|---|---|
| Kill Reward | 75 | 75 | 75 | 75 |
| XP | 34 | 45 | 60 | 69 |
| Base Health (body) | 935 | 1100 | 1210 | 1210 |
| Base Health (head) | 510 | 600 | 630 | 660 |
For kill reward calculations read Dosh Mechanics.
Scrakes have their base health value scaled accordingly to the number of players in the game.
| Normal | Hard | Suicidal | Hell on earth | |
|---|---|---|---|---|
| Body / Head (1 player) | 935 / 510 | 1100 / 600 | 1210 / 630 | 1210 / 660 |
| Body / Head (2 players) | 1299 / 652 | 1529 / 768 | 1681 / 806 | 1681 / 844 |
| Body / Head (3 players) | 1664 / 795 | 1958 / 936 | 2153 / 982 | 2153 / 1029 |
| Body / Head (4 players) | 2028 / 938 | 2387 / 1104 | 2625 / 1159 | 2625 / 1214 |
| Body / Head (5 players) | 2393 / 1081 | 2816 / 1272 | 3097 / 1335 | 3097 / 1399 |
| Body / Head (6 players) | 2758 / 1224 | 3245 / 1440 | 3569 / 1512 | 3569 / 1584 |
Attacks

The base damage value further modified by the difficulty-specific multipliers.
XP Notes
- Killing with weapons other than your current perk grants the XP to the perk that weapons belongs to.
- Damaging with on-perk weapons and then finishing it off with an off-perk weapon divides the XP and grants it to both perks.
- Assist kills grants full XP.
Speed
Scrakes will only sprint when their overall health drops below a certain threshold, determined by difficulty. This threshold is 50% on Normal, 75% on Hard and Suicidal, and 90% on Hell on Earth.
Scrakes will never stop sprinting until they are killed.
Movement speed is randomized within ± 10% range and further modified by a multiplier based on difficulty. This value is 0.87 on Normal and 1.05 on Hell On Earth.
| Normal | Hard | Suicidal | Hell on earth | |
|---|---|---|---|---|
| Speed (walking) | 133 - 163 | 153 - 187 | 153 - 187 | 160 - 196 |
| Speed (sprinting) | 470 - 574 | 540 - 660 | 540 - 660 | 567 - 693 |
| Rage Threshold (Health %) | 50% | 75% | 75% | 90% |
Scrake has 100% sprint chance when it's health drops below the Rage Threshold.
For comparison, by default a healthy player character with the minimal weight walks at speed of 383 units/s, and sprints at speed of 460 units/s.
Resistances and Weaknesses

Damage Resistance
Scrakes greatly resist multiple forms of damage, and they have only one weakness. Scrake has a unique weakness to the RPG-7's ballistic impact damage. The Scrake will take 400% damage when directly hit by an RPG.
| Piercing | Slashing | Bludgeon | Toxic | Fire | Microwave | Explosives | RPG-7 Impact | Freeze | Shells | |
|---|---|---|---|---|---|---|---|---|---|---|
| Damage Multipler | x0.75 | x1 | x1 | x0.25 | x0.3 | x1 | x0.4 | x4 | x1 | x1 |
Ballistic Resistance
Scrakes are slightly resistant to handguns and shotguns, but are neuntral to every other types of ballistic weaponry.
| Sub-machine Gun | Assault Rifle | Shotgun | Handgun | Rifle | |
|---|---|---|---|---|---|
| Damage Multiplier | x1 | x1 | x0.9 | x0.8 | x1 |
Hitzones
Scrakes only have one weak spot, which is the head. Their chainsaw deflects attacks.
| Damage Multiplier | |
|---|---|
| Head | x1.1 |
| Chainsaw | x0.2 |
| All other | x1 |
Incapacitation Resistance

Miscellaneous Information
Affliction handling:

- Scrake cannot teleport nor get frustrated.
- (PvP) Rally boost: players do x1.2 more damage.
- Damage to doors = 450.
- ZED mass = 130.
- Should sprint if health percentage < rage threshold AND should not stop sprinting afterwards.
- Scrake cannot evade a grenades once enraged.
- EMP effect (disrupt) temporary prevents Scrake from sprinting.
- Scrake has a chance to block upon taking damage or when being aimed at. Scrake has a chance to evade certain damage sources. Scrake cannot block when enraged.
- Chance to block after taking damage: Normal - 0.05, Hard - 0.1, Suicidal - 0.4, HOE - 0.5. Health loss percentage to trigger block: all difficulties - 0.05. Block chains (max): Normal - 3, Hard - 4, Suicidal - 5, HOE - 6. Block duration - 1.25s, cooldown - 5s.
- When blocking. Damage resistance: Melee attacks - x0.9, Gun attacks - x0.9. Affliction multiplier - x0.2 (ZED takes only 20% of all incoming powers). Solo game block chance multiplier: Normal, Hard - x0.1, Suicidal - x0.2, HOE - x0.3.
Behavior
The Scrake is a highly dangerous ZED. It boasts high health, speed and damage. Care should be taken when engaging the Scrake.
Upon spawning, the Scrake lets out a global roar that can be heard regardless of position, followed by the sound of a chainsaw revving up.
Scrakes walk slowly towards players and attack slowly until they are enraged.
Because of this behavior, Scrakes will never rage until they are shot at. Using this fact, a team can safely ignore Scrakes through kiting and killing lesser ZEDs until they are ready to deal with Scrakes.
Scrakes enrage once they have taken enough damage. They will begin to sprint and attack relentlessly.
While calm, Scrakes can block gunfire. When aimed at or shot at, the Scrake will almost always block its face with the chainsaw arm. While blocking, the Scrake takes 80% damage and incapacitating effects are only 20% effective. The Scrake cannot block once it is enraged.
While calm, Scrakes attack with small arcing slashes and stabbing attacks. When enraged, Scrakes begin to swing their chainsaws in wide arcs, spinning around multiple times and attacking with increased ferocity. They have the potential to hit multiple players with their attacks.
Once enraged, Scrakes can attack with unparry-able attacks. These animations can be identified by the chainsaw glowing red. This means that the Scrake will not be stumbled or knocked back when these attacks are parried.
Scrakes can deal hideous amounts of damage once enraged and should be killed as soon as possible before they can kill players with their area of effect attacks. It is impossible to stop a Scrake from raging once it starts, however EMP Grenades and Freeze Grenades are able to temporarily stop its rage.
On Suicidal and Hell On Earth, Scrakes do not gain any additional abilities or attack animations; Instead they simply enrage quicker at higher health thresholds.
Extermination Tactics
Scrakes are extremely dangerous ZEDs that should not be engaged alone unless you are properly equipped to exterminate it in a short time span, to ensure that it does minimal damage.
Generally, do not shoot and enrage Scrakes when the team is ill-equipped or unaware of its presence. Doing so could cause the enraged Scrake to kill an unsuspecting player who is busy dealing with the lesser ZEDs. It is very easy to cause a wipe when a player shoots multiple Scrakes and causes them to rage at once, who then proceed to tear the team apart.
Quick decapitation kills are the preferred method of extermination. This can either be done alone or with the help of your teammates. If your perk is one that is geared towards killing large enemies (Demolitionist, Gunslinger, Sharpshooter, or Berserker), you are often able to easily kill Scrakes on your own as it is your role in the team.
It is also important to note that the playstyle that you should go for will change based on the composition of your team. If your team is a headshot focused team (For example: Sharpshooter, Commando, Support, Gunslinger, Medic, Eviscerator Berserker), it is preferred to exterminate Scrakes via decapitation. If your team is a body damage focused team (For example: Firebug, Support, Demolitionist, 2 Melee Berserkers, Medic), then extermination through sheer body damage is a viable tactic as well.
Gunslinger
Gunslingers can swiftly decapitate Scrakes with repeated headshots using Dual .500 Magnums or Dual .50 Desert_Eagles. This is especially true with a Gunslinger that has the Rack'em Up skill, which massively increases headshot damage.
Desert Eagles and Magnums have stopping power; Around the 4th to 6th repeated headshot the Scrake will be flinched momentarily, and you should use this split second to pump as much lead into its head as possible. This is usually enough to kill it.
Failure to decapitate the Scrake before it gets into striking range can be devastating in multiplayer games, as once they start to attack they swing with full body pivots, making their heads very difficult to hit. This usually results in the team having to kill a Scrake through body damage, thus wasting the headshot damage and ammunition.
Sharpshooter
Sharpshooters are practically geared to take out Scrakes with no difficulty. In particular, the Rail Gun with auto-lock turned off, and with all possible damage skills equipped, can take out a Scrake in a single headshot on Hell On Earth difficulty with 6 players.
For lower level Sharpshooters, it most definitely will take 2 Rail Gun shots to kill a Scrake, even without using lock-on mode. It may be more beneficial to take the Ballistic Shock skill to make the first Rail Gun headshot stun, which gives the Sharpshooter enough time to line up a second, killing shot.
The Sharpshooter also has the option of using the M14 EBR and the Crossbow combo to kill Scrakes. Generally, it's using the M14 EBR with the Ballistic Shock skill to increase its stunning power. At around the 4th consecutive headshot, the M14 EBR will stun the Scrake, which leaves it standing still for about 1.5 seconds. At this point, either continue shooting its head to decapitate it, or pull out the Crossbow to deal the killing blow (which would be significantly buffed up by the headshot bonus of Rack'Em Up skill).
Alternatively, firing a Crossbow bolt into the head of a Scrake will stun it immediately, allowing the Sharpshooter to pull out the M14 EBR and dump bullets into its head, usually decapitating the Scrake before the stun ends if the Sharpshooter is not interrupted.
Demolitionist
While Scrakes take reduced damage from explosives, the Demolitionist is able to exterminate Scrakes in a single shot using the RPG-7. The Scrake has a unique weakness to the RPG-7's ballistic impact damage.
Using this extreme vulnerability, a Demolitionist with all possible damage skills equipped can deal massive damage to, if not outright remove, the head of a Scrake in lower difficulty 6 player games. On Suicidal and Hell On Earth, some form of damage has to be applied to ensure the RPG-7 Impact finishes off the Scrake.
If you must help the team to kill Scrakes, you must hit it directly with the RPG. The explosions do minimal damage to Scrakes.
Berserker
Berserkers have two ways to deal with Scrakes: At range, with the Eviscerator, or in melee combat, with the Pulverizer or Zweihander.
If you choose the Eviscerator method, only a maximum of 2 headshots are needed to cut off the Scrake's head. The first shot to the head will enrage it, and the second will take its head off. The challenge here is landing the second hit while it is running at you and swaying its head.
This second hit can be made easier by throwing an EMP to temporarily calm it down, making it walk again.
If you choose the melee method, you will have to familiarize yourself with the blocking and parrying mechanics, as you'll need it to interrupt the Scrake's attacks and reduce the damage you take. Strike at its head in between its attacks or after a successful parry.
Repeatedly landing strong attacks on the Scrake will eventually stumble it or even knock it down, allowing you to get multiple free hits on it while it is recovering.
In a team environment, the ranged method is preferred over the melee method. Good usage of EMPs can allow a coordinated team to decapitate a Scrake without it ever enraging. With the massive damage of the Eviscerator, you are already able to deal half the damage needed to decapitate a Scrake; Your team just has to do the other half.
If your team is a body damage focused team composition, however, and you are a melee Berserker, it is your job to hold the Scrake's attention and tank it while your team piles up the damage. Land some strong hits of your own to contribute damage.
You can also save teammates from raging Scrakes by throwing EMP to stop them from raging, which can allow you to catch up to the Scrake and make it change aggression towards you, allowing your teammates to regroup and heal up.
Commando
Commandos, unfortunately, are ill-equipped to deal with Scrakes in multiplayer games; especially 6 player games. Their assault rifles lack enough burst damage to kill them safely, and they do not have any sort of incapacitating power aside from a stumble.
While the max level Commando can do enough damage to take off a Scrake's head within one magazine of the SCAR-H Assault Rifle, the Scrake will almost certainly enrage, and will have enough time to charge into melee range and cut the player up.
It also requires the player to not miss a single shot as the margin of error is very small, and the time needed to reload or pull out different weapon can mean the difference between successfully decapitating the Scrake with minimal damage taken, or walking away with only 15 HP remaining, or straight up dying.
Commandos contribute better to a Scrake fight by continuing to take out the lesser ZEDs to allow the team's more specialized perks to focus on taking down Scrakes.
Remember to help the team by contributing headshot damage if the Scrake is incapacitated.
Medic
In a Scrake fight, the Medic's job is to heal the team and keep them alive; Especially the Berserker who is most likely in front of the team.
Remember to contribute headshot damage whenever possible, especially when the Scrake has been stunned by your teammates or EMP'd by the Berserker.
If a low HP teammate is being chased by a raging Scrake, you can help by stumbing it, thanks to the high stumble power values of the medic weapons. You can cancel the Scrake's attacks this way, which can give your teammate enough time to run away and heal up from your medic darts.
Support
Support Specialists are very capable of taking down Scrakes too. They are able to do efficiently through both body health or head health damage.
When going for body damage, wildly firing at it with the AA-12 Auto Shotgun or the M4 Combat Shotgun is enough in most cases, though in later waves this can prove problematic as the player will run out of ammunition quickly, even with the team contributing damage.
Support Specialists can also kill Scrakes through kiting using the Double-barreled Boomstick. Whenever the Scrake is about to attack, jump and aim downwards at it, then fire both barrels at once, using the recoil to push yourself out of the Scrake's attack range. Simply repeat until it dies.
However the more ammo-efficient way to take down Scrakes is repeated headshots using the AA-12 Auto Shotgun. Players can quickly decapitate Scrakes with good aim, especially at close range when Shotgun distance fall-off damage is minimal.
Do not be afraid to run up to Scrakes to shoot them in the head when they are incapacitated. Support Specialists deal the most damage when they are close to their targets, and stunned Scrakes are sitting ducks. Most of the time, with combined firepower from the team, the Scrake will be decapitated before the incapacitation effects end.
Alternatively, one can damage the Scrake's head with multiple shots using the AA-12 Auto Shotgun, then finishing it off with a double barreled blast using the Boomstick. The trick here is to use the melee bash (V) to flinch the Scrake after it enrages to set it up for a point-blank shot to the head using the Boomstick - However this is very difficult to pull off and risky as it requires you to run up to the Scrake and melee it.
SWAT
SWATs have a very valuable tool for Scrake extermination in the form of their FlashBang grenades. These grenades will stun a Scrake on demand, allowing a quick coordinated team to decapitate the Scrake while it is stunned.
High level SWATs with increased magazine capacity for their P90 SMG or Kriss SMG can take down Scrakes alone competently with the help of their Flashbangs; Simply toss a Flashbang at a Scrake and then spray at it's head. With good recoil control and at close enough range, you are able to remove the Scrake's head on your own before it can enrage.
Firebug
The Firebug's role changes based on the team's composition. If the team is a body damage focused team, the Firebug can help in Scrake extermination with the Microwave Gun, which does good DPS to Scrakes.
If the team is a headshot damage focused team, the Firebug will contribute better by continuing to provide crowd control. Kill the lesser ZEDs and protect your team's more specialized perks to give them the breathing room they need to take down Scrakes.
Try not to set Scrakes on fire as they are highly resistant to fire. Secondly, when Scrakes start to panic from Fire, they will run around erratically with their heads swaying around randomly, making their heads extremely hard for your teammates to hit.
When fleeing from combat or running around corners, the Firebug can provide enough incapacitation effects to stop Scrakes from attacking or chasing the fleeing team for a few seconds by setting them on fire.
Gallery
-
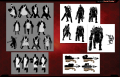
Artbook concept 1
-
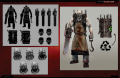
Artbook concept 2
-
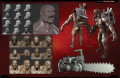
Artbook concept 3
-
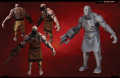
Artbook renders


