Profile Texture Creation
Overview
The profile textures are the images that show up when selecting a character through the profile menu in Killing floor.
There are 2 images needed for this. A "locked" image and an "unlocked" image. The resolution should be 256 pixels wide by 512 tall.
Creating the render for your profile image
Download the 3ds max lighting scene here Example Portrait 3ds Max Scene
This is a scene that has lighting and a camera set up that is consistent with all the profile images in the game. Replace the character in the scene with your character by hiding the existing one. Tweak the camera position and intensities of lighting to work with your new character. The lighting is meant to be "high contrast" so its ok if its partly blown out. Look at the other profile textures for a style examples. All of the profile images are in one package in Killing Floor and you can find it here: KillingFloor\Textures\KFPortraits.utx
Once you have the lighting to your liking, press render and save as an uncompressed 32bit targa file. The 32 bit is important so you retain the alpha channel.
Stylizing your render
Download the .psd template here: Killing Floor Portrait Photoshop Example
Open your render in photoshop and paste your profile image in the psd.
Killing Floor uses a pixelated graphic effect on top of your render. This is made by the following steps:
1. Create a new photoshop file with a copy of your profile image.
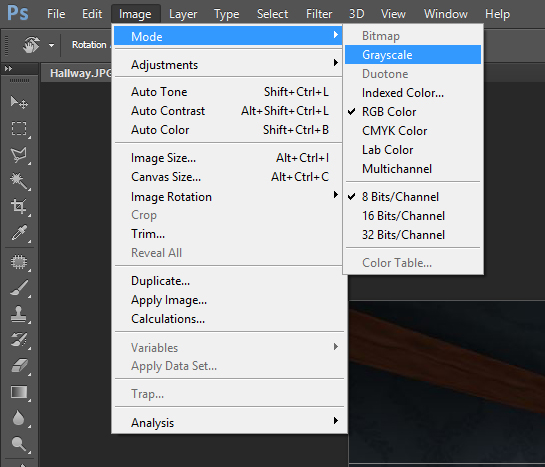
2. go to Image > Mode > Grayscale (this will desaturate your image, that's ok, don't worry)
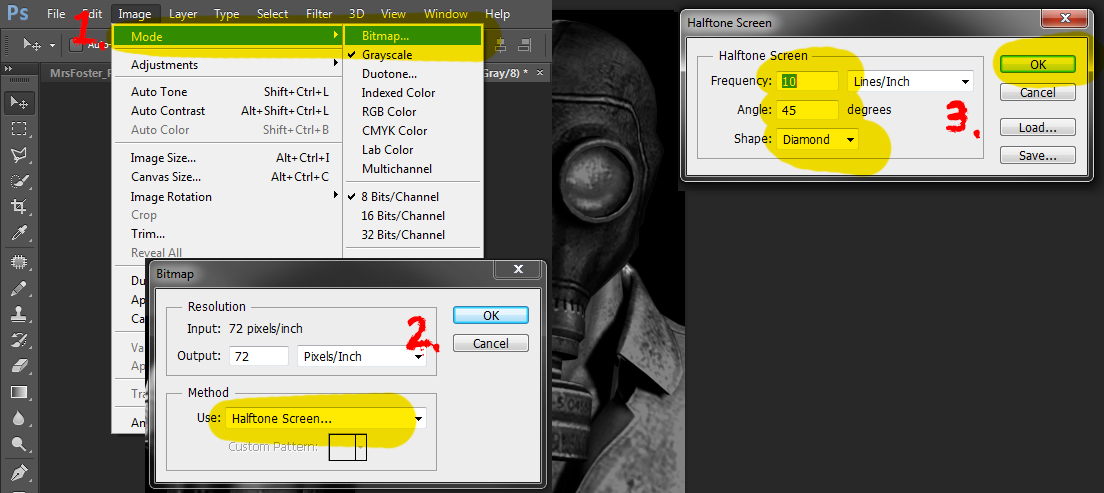
3. go to Image > Mode > Bitmap and follow the following settings:
4. your image should now look like this
5. Paste this image overtop your original render and set it to Multiply mode at 15% opacity
6. use the curves and hue saturation adjustment layers for any final tweaks
7. your final profile image should look like this
8. Save your profile image out as a .dds DXT1 compression using the nvidia texture tools available for photoshop here : Nvidia Texture Tools
9. Import your texture in Killing Floor unreal texture package in a group called "Portrait"
10. Right click on your new portrait texture and under the texture group, set the LODset to LODSet_Interface. This sets the mip map settings to the Interface group. See below picture.

