Template:KF2WeaponInfo: Difference between revisions
Jump to navigation
Jump to search
(Added Game version so if there are outdated stats everyone will now because of the version which is displayed below the info box) |
(Small design changes and fixed appearance in IE) |
||
| Line 1: | Line 1: | ||
<includeonly>{|style="background: #000000; border-collapse: collapse; color: #a6a7a9; float: right; margin: 0 0 16px 24px; text-align: left; vertical-align: middle; width: 350px;" | <includeonly>{|style="background: #000000; border-collapse: collapse; color: #a6a7a9; float: right; margin: 0 0 16px 24px; padding: 0; text-align: left; vertical-align: middle; width: 350px;" | ||
|- style="background: #ffffff; color: # | |- style="background: #ffffff; color: #252525; text-align: center;" | ||
| colspan="4" style="padding: 0 0 2px;" | <small>''[[Killing Floor 2]] item''</small> | | colspan="4" style="padding: 0 0 2px;" | <small>''[[Killing Floor 2|<span style="color: #252525;">Killing Floor 2</span>]] item''</small> | ||
|- style="background: #ffffff; color: #ffffff; text-align: center;" | |- style="background: #ffffff; color: #ffffff; text-align: center;" | ||
| colspan="4" style="padding: 0; | | colspan="4" style="padding: 0; background: linear-gradient(transparent 50%, #202224 50%), linear-gradient(135deg, transparent 5px, #bd0000 0, #bd0000 60%, transparent 60%) top left, linear-gradient(225deg, transparent 5px, #bd0000 0, #bd0000 60%, transparent 60%) top right; vertical-align: top; position: relative; height: 43px; width: 100%;" | <div style="background: linear-gradient(135deg, transparent 5px, #202224 0, #202224 60%, transparent 60%) top left, linear-gradient(225deg, transparent 5px, #202224 0, #202224 60%, transparent 60%) top right; display: table; padding: 0; position: relative; left: 0; top: 5px; height: 30px; width: 350px;"><div style="display: table-cell; vertical-align: middle;">'''{{{Name}}}'''</div><div style="position: absolute; top: 5px; left: 12px;">[[File:{{{PerkImage}}}|20px|top|link={{#if: {{{PerkLink|}}}|{{{PerkLink}}}|}}]]</div></div><div style="background: linear-gradient(135deg, transparent 5px, #000000 0, #000000 60%, transparent 60%) top left, linear-gradient(225deg, transparent 5px, #000000 0, #000000 60%, transparent 60%) top right; height: 8px; left: 0; position: absolute; top: 35px; width: 100%;"></div> | ||
|- style="text-align: center;" | |- style="text-align: center;" | ||
| colspan="4" style="padding: 0 12px 12px;" | [[File:{{{WeaponImage}}}|326px]] | | colspan="4" style="padding: 0 12px 12px;" | [[File:{{{WeaponImage}}}|326px]] | ||
|- {{#if: {{{MagazineSize|}}} | style="background: #202224; font-size: 125%; height: 30px;" | style="display: none;"}} | |- {{#if: {{{MagazineSize|}}} | style="background: #202224; font-size: 125%; height: 30px;" | style="display: none;"}} | ||
| colspan="2" style="padding | | colspan="2" style="padding: 0 0 0 12px;" | Magazine Size | ||
| colspan="2" style="padding | | colspan="2" style="padding: 0 12px 0 0; text-align: right;" | {{{MagazineSize}}} [[File:KF2_Magazine_Gray.png|baseline|13px|link=]] | ||
|- {{#if: {{{AmmoCapacity|}}} | style="background: #202224; font-size: 125%; height: 30px;" | style="display: none;"}} | |- {{#if: {{{AmmoCapacity|}}} | style="background: #202224; font-size: 125%; height: 30px;" | style="display: none;"}} | ||
| colspan="2" style="padding | | colspan="2" style="padding: 0 0 0 12px;" | Ammo Capacity | ||
| colspan="2" style="padding | | colspan="2" style="padding: 0 12px 0 0; text-align: right;" | {{{AmmoCapacity}}} [[File:KF2_Ammo_Gray.png|baseline|13px|link=]] | ||
|- {{#ifexpr: ({{#if: {{{MagazineSize|}}} | 1 | 0}} or {{#if: {{{AmmoCapacity|}}} | 1 | 0}}) and ({{#if: {{{Damage|}}} | 1 | 0}} or {{#if: {{{FireRate|}}} | 1 | 0}} or {{#if: {{{Accuracy|}}} | 1 | 0}} or {{#if: {{{Penetration|}}} | 1 | 0}}) || style="display: none;"}} | |- {{#ifexpr: ({{#if: {{{MagazineSize|}}} | 1 | 0}} or {{#if: {{{AmmoCapacity|}}} | 1 | 0}}) and ({{#if: {{{Damage|}}} | 1 | 0}} or {{#if: {{{FireRate|}}} | 1 | 0}} or {{#if: {{{Accuracy|}}} | 1 | 0}} or {{#if: {{{Penetration|}}} | 1 | 0}}) | style="height: 6px;" | style="display: none;"}} | ||
| colspan="4" style="height: 6px;" | | | colspan="4" style="padding: 0; height: 6px;" | | ||
|- {{#if: {{{Damage|}}} | style="height: 20px;" | style="display: none;"}} | |- {{#if: {{{Damage|}}} | style="height: 20px;" | style="display: none;"}} | ||
| style="padding | | style="padding: 0 0 0 12px; width: 136px;" | '''Damage''' | ||
| colspan="2" style="width: 158px;" | <div style="background: #202224; display: table-cell; height: 12px; margin | | colspan="2" style="padding: 0; width: 158px;" | <div style="background: #202224; display: table-cell; height: 12px; margin: 4px 0 0 0; width: 100px;"><div style="background: #ffffff; height: 12px; position: relative; top: 0; left: 0; width: {{#expr: (({{#ifeq: {{#expr: {{{Damage}}} / 820 <= 1}} | 1 | {{#expr: {{{Damage}}} / 820}} | 1 }}) ^ 0.5) * 100 }}px"></div></div> | ||
| style="padding | | style="padding: 0 12px 0 0; text-align: right;" | {{#expr: {{{Damage}}} round 0}} | ||
|- {{#if: {{{FireRate|}}} | style="height: 20px;" | style="display: none;"}} | |- {{#if: {{{FireRate|}}} | style="height: 20px;" | style="display: none;"}} | ||
| style="padding | | style="padding: 0 0 0 12px; width: 136px;" | '''Fire Rate''' | ||
| colspan="2" style="width: 158px;" | <div style="background: #202224; display: table-cell; height: 12px; margin | | colspan="2" style="padding: 0; width: 158px;" | <div style="background: #202224; display: table-cell; height: 12px; margin: 4px 0 0 0; width: 100px;"><div style="background: #ffffff; height: 12px; position: relative; top: 0; left: 0; width: {{#expr: ({{#ifeq: {{#expr: {{{FireRate}}} / 800 <= 1}} | 1 | {{#expr: {{{FireRate}}} / 800}} | 1 }}) * 100 }}px"></div></div> | ||
| style="padding | | style="padding: 0 12px 0 0; text-align: right;" | {{#expr: {{{FireRate}}} round 0}} | ||
|- {{#if: {{{Accuracy|}}} | style="height: 20px;" | style="display: none;"}} | |- {{#if: {{{Accuracy|}}} | style="height: 20px;" | style="display: none;"}} | ||
| style="padding | | style="padding: 0 0 0 12px; width: 136px;" | '''Accuracy''' | ||
| colspan="2" style="width: 158px;" | <div style="background: #202224; display: table-cell; height: 12px; margin | | colspan="2" style="padding: 0; width: 158px;" | <div style="background: #202224; display: table-cell; height: 12px; margin: 4px 0 0 0; width: 100px;"><div style="background: #ffffff; height: 12px; position: relative; top: 0; left: 0; width: {{#expr: (({{#ifeq: {{#expr: {{{Accuracy}}} / 100 <= 1}} | 1 | {{#expr: {{{Accuracy}}} / 100}} | 1 }}) ^ 0.5) * 100 }}px"></div></div> | ||
| style="padding | | style="padding: 0 12px 0 0; text-align: right;" | {{#expr: {{{Accuracy}}} round 0}} | ||
|- {{#if: {{{Penetration|}}} | style="height: 20px;" | style="display: none;"}} | |- {{#if: {{{Penetration|}}} | style="height: 20px;" | style="display: none;"}} | ||
| style="padding | | style="padding: 0 0 0 12px; width: 136px;" | '''Penetration''' | ||
| colspan="2" style="width: 158px;" | <div style="background: #202224; display: table-cell; height: 12px; margin | | colspan="2" style="padding: 0; width: 158px;" | <div style="background: #202224; display: table-cell; height: 12px; margin: 4px 0 0 0; width: 100px;"><div style="background: #ffffff; height: 12px; position: relative; top: 0; left: 0; width: {{#expr: ({{#ifeq: {{#expr: {{{Penetration}}} / 4 <= 1}} | 1 | {{#expr: {{{Penetration}}} / 4}} | 1 }}) * 100 }}px"></div></div> | ||
| style="padding | | style="padding: 0 12px 0 0; text-align: right;" | {{#expr: {{{Penetration}}} round 1}} | ||
|- {{#ifexpr: ({{#if: {{{Damage|}}} | 1 | 0}} or {{#if: {{{FireRate|}}} | 1 | 0}} or {{#if: {{{Accuracy|}}} | 1 | 0}} or {{#if: {{{Penetration|}}} | 1 | 0}} or {{#if: {{{MagazineSize|}}} | 1 | 0}} or {{#if: {{{AmmoCapacity|}}} | 1 | 0}}) and {{#if: {{{Description|}}} | 1 | 0}} || style="display: none;"}} | |- {{#ifexpr: ({{#if: {{{Damage|}}} | 1 | 0}} or {{#if: {{{FireRate|}}} | 1 | 0}} or {{#if: {{{Accuracy|}}} | 1 | 0}} or {{#if: {{{Penetration|}}} | 1 | 0}} or {{#if: {{{MagazineSize|}}} | 1 | 0}} or {{#if: {{{AmmoCapacity|}}} | 1 | 0}}) and {{#if: {{{Description|}}} | 1 | 0}} | style="height: 6px;" | style="display: none;"}} | ||
| colspan="4" style="height: 6px;" | | | colspan="4" style="padding: 0; height: 6px;" | | ||
|- {{#if: {{{Description|}}} || style="display: none;"}} | |- {{#if: {{{Description|}}} || style="display: none;"}} | ||
| colspan="4" style="padding: 0 10px" | {{{Description}}} | | colspan="4" style="padding: 0 10px" | {{{Description}}} | ||
|- {{#ifexpr: {{#if: {{{Damage|}}} | 1 | 0}} or {{#if: {{{FireRate|}}} | 1 | 0}} or {{#if: {{{Accuracy|}}} | 1 | 0}} or {{#if: {{{Penetration|}}} | 1 | 0}} or {{#if: {{{MagazineSize|}}} | 1 | 0}} or {{#if: {{{AmmoCapacity|}}} | 1 | 0}} or {{#if: {{{Description|}}} | 1 | 0}} || style="display: none;"}} | |- {{#ifexpr: {{#if: {{{Damage|}}} | 1 | 0}} or {{#if: {{{FireRate|}}} | 1 | 0}} or {{#if: {{{Accuracy|}}} | 1 | 0}} or {{#if: {{{Penetration|}}} | 1 | 0}} or {{#if: {{{MagazineSize|}}} | 1 | 0}} or {{#if: {{{AmmoCapacity|}}} | 1 | 0}} or {{#if: {{{Description|}}} | 1 | 0}} | style="height: 6px;" | style="display: none;"}} | ||
| colspan="4" style="height: 6px;" | | | colspan="4" style="padding: 0; height: 6px;" | | ||
|- {{#ifexpr: {{#if: {{{PerkName|}}} | 1 | 0}} or {{#if: {{{Pricing|}}} | 1 | 0}} or {{#if: {{{Weight|}}} | 1 | 0}} | style="background: # | |- {{#ifexpr: {{#if: {{{PerkName|}}} | 1 | 0}} or {{#if: {{{Pricing|}}} | 1 | 0}} or {{#if: {{{Weight|}}} | 1 | 0}} | style="background: #000000; color: #ffffff; text-align: center;" | style="display: none;"}} | ||
| colspan="4" style="height: | | colspan="4" style="padding: 0; background: linear-gradient(transparent 50%, #202224 50%), linear-gradient(135deg, transparent 5px, #bd0000 0, #bd0000 60%, transparent 60%) top left, linear-gradient(225deg, transparent 5px, #bd0000 0, #bd0000 60%, transparent 60%) top right; vertical-align: top; position: relative; top: 2px; height: 43px; width: 100%;" | <div style="background: linear-gradient(135deg, transparent 5px, #202224 0, #202224 60%, transparent 60%) top left, linear-gradient(225deg, transparent 5px, #202224 0, #202224 60%, transparent 60%) top right; display: table; padding: 0; position: relative; left: 0; top: 5px; height: 30px; width: 350px;"><div style="display: table-cell; vertical-align: middle;">'''General Information'''</div></div><div style="background: linear-gradient(135deg, transparent 5px, #000000 0, #000000 60%, transparent 60%) top left, linear-gradient(225deg, transparent 5px, #000000 0, #000000 60%, transparent 60%) top right; height: 8px; left: 0; position: absolute; top: 35px; width: 100%;"></div> | ||
|- {{#if: {{{PerkName|}}} | style="height: 20px;" | style="display: none;"}} | |- {{#if: {{{PerkName|}}} | style="height: 20px;" | style="display: none;"}} | ||
| style="padding | | style="padding: 0 0 0 12px;" | '''Perk''' | ||
| colspan="3" style="padding | | colspan="3" style="padding: 0 12px 0 0; text-align: right;" | {{#if: {{{PerkLink}}}|[[{{{PerkLink}}}|<span style="color: #a6a7a9;">{{{PerkName}}}</span>]]|{{{PerkName}}}}} | ||
|- {{#if: {{{Pricing|}}} | style="height: 20px;" | style="display: none;"}} | |- {{#if: {{{Pricing|}}} | style="height: 20px;" | style="display: none;"}} | ||
| style="padding | | style="padding: 0 0 0 12px;" | '''Pricing''' | ||
| colspan="3" style="padding | | colspan="3" style="padding: 0 12px 0 0; text-align: right;" | [[File:KF2_Dosh_Gray.png|baseline|10px|link=]] {{{Pricing}}} | ||
|- {{#if: {{{Weight|}}} | style="height: 20px;" | style="display: none;"}} | |- {{#if: {{{Weight|}}} | style="height: 20px;" | style="display: none;"}} | ||
| style="padding | | style="padding: 0 0 0 12px;" | '''Weight''' | ||
| colspan="3" style="padding | | colspan="3" style="padding: 0 12px 0 0; text-align: right;" | [[File:KF2_Weight_Gray.png|baseline|10px|link=]] {{{Weight}}} | ||
|- {{#ifexpr: {{#if: {{{PerkName|}}} | 1 | 0}} or {{#if: {{{Pricing|}}} | 1 | 0}} or {{#if: {{{Weight|}}} | 1 | 0}} || style="display: none;"}} | |- {{#ifexpr: {{#if: {{{PerkName|}}} | 1 | 0}} or {{#if: {{{Pricing|}}} | 1 | 0}} or {{#if: {{{Weight|}}} | 1 | 0}} | style="height: 6px;" | style="display: none;"}} | ||
| colspan="4" style="height: 6px;" | | | colspan="4" style="padding: 0; height: 6px;" | | ||
|- {{#ifexpr: {{#if: {{{InitialSpareMags|}}} | 1 | 0}} or {{#if: {{{AmmoCost|}}} | 1 | 0}} or {{#if: {{{Block|}}} | 1 | 0}} or {{#if: {{{Parry|}}} | 1 | 0}} or {{#if: {{{HealAmount|}}} | 1 | 0}} or {{#if: {{{HealAmountSolo|}}} | 1 | 0}} or {{#if: {{{HealRecharge|}}} | 1 | 0}} or {{#if: {{{HealRechargeSelf|}}} | 1 | 0}} or {{#if: {{{WeaponType|}}} | 1 | 0}} or {{#if: {{{SecondaryMagazineSize|}}} | 1 | 0}} or {{#if: {{{SecondaryAmmoCapacity|}}} | 1 | 0}} or {{#if: {{{SecondaryAmmoImage|}}} | 1 | 0}} or {{#if: {{{SecondaryAmmoConsumption|}}} | 1 | 0}} or {{#if: {{{SecondaryAmmoCost|}}} | 1 | 0}} or {{#if: {{{Custom_0_Entry|}}} | 1 | 0}} or {{#if: {{{Custom_1_Entry|}}} | 1 | 0}} or {{#if: {{{Custom_2_Entry|}}} | 1 | 0}} or {{#if: {{{Custom_3_Entry|}}} | 1 | 0}} or {{#if: {{{Custom_4_Entry|}}} | 1 | 0}} or {{#if: {{{Custom_5_Entry|}}} | 1 | 0}} or {{#if: {{{Custom_6_Entry|}}} | 1 | 0}} or {{#if: {{{Custom_7_Entry|}}} | 1 | 0}} or {{#if: {{{Custom_8_Entry|}}} | 1 | 0}} or {{#if: {{{Custom_9_Entry|}}} | 1 | 0}} | style="background: # | |- {{#ifexpr: {{#if: {{{InitialSpareMags|}}} | 1 | 0}} or {{#if: {{{AmmoCost|}}} | 1 | 0}} or {{#if: {{{Block|}}} | 1 | 0}} or {{#if: {{{Parry|}}} | 1 | 0}} or {{#if: {{{HealAmount|}}} | 1 | 0}} or {{#if: {{{HealAmountSolo|}}} | 1 | 0}} or {{#if: {{{HealRecharge|}}} | 1 | 0}} or {{#if: {{{HealRechargeSelf|}}} | 1 | 0}} or {{#if: {{{WeaponType|}}} | 1 | 0}} or {{#if: {{{SecondaryMagazineSize|}}} | 1 | 0}} or {{#if: {{{SecondaryAmmoCapacity|}}} | 1 | 0}} or {{#if: {{{SecondaryAmmoImage|}}} | 1 | 0}} or {{#if: {{{SecondaryAmmoConsumption|}}} | 1 | 0}} or {{#if: {{{SecondaryAmmoCost|}}} | 1 | 0}} or {{#if: {{{Custom_0_Entry|}}} | 1 | 0}} or {{#if: {{{Custom_1_Entry|}}} | 1 | 0}} or {{#if: {{{Custom_2_Entry|}}} | 1 | 0}} or {{#if: {{{Custom_3_Entry|}}} | 1 | 0}} or {{#if: {{{Custom_4_Entry|}}} | 1 | 0}} or {{#if: {{{Custom_5_Entry|}}} | 1 | 0}} or {{#if: {{{Custom_6_Entry|}}} | 1 | 0}} or {{#if: {{{Custom_7_Entry|}}} | 1 | 0}} or {{#if: {{{Custom_8_Entry|}}} | 1 | 0}} or {{#if: {{{Custom_9_Entry|}}} | 1 | 0}} | style="background: #000000; color: #ffffff; text-align: center;" | style="display: none;"}} | ||
| colspan="4" style=" | | colspan="4" style="padding: 0; background: linear-gradient(transparent 50%, #202224 50%), linear-gradient(135deg, transparent 5px, #bd0000 0, #bd0000 60%, transparent 60%) top left, linear-gradient(225deg, transparent 5px, #bd0000 0, #bd0000 60%, transparent 60%) top right; vertical-align: top; position: relative; top: 2px; height: 43px; width: 100%;" | <div style="background: linear-gradient(135deg, transparent 5px, #202224 0, #202224 60%, transparent 60%) top left, linear-gradient(225deg, transparent 5px, #202224 0, #202224 60%, transparent 60%) top right; display: table; padding: 0; position: relative; left: 0; top: 5px; height: 30px; width: 350px;"><div style="display: table-cell; vertical-align: middle;">'''Weapon Information'''</div></div><div style="background: linear-gradient(135deg, transparent 5px, #000000 0, #000000 60%, transparent 60%) top left, linear-gradient(225deg, transparent 5px, #000000 0, #000000 60%, transparent 60%) top right; height: 8px; left: 0; position: absolute; top: 35px; width: 100%;"></div> | ||
|- {{#if: {{{InitialSpareMags|}}} | style="height: 20px;" | style="display: none;"}} | |- {{#if: {{{InitialSpareMags|}}} | style="height: 20px;" | style="display: none;"}} | ||
| colspan="2" style="padding | | colspan="2" style="padding: 0 0 0 12px; vertical-align: top; white-space: nowrap;" | '''Starting Ammo''' | ||
| colspan="2" style="padding | | colspan="2" style="padding: 0 12px 0 0; text-align: right;" | {{{MagazineSize}}} {{#ifeq: {{{InitialSpareMags}}} | 0 || + {{#expr: {{{InitialSpareMags}}} * {{{MagazineSize}}}}}}} [[File:KF2_Ammo_Gray.png|baseline|10px|link=]] | ||
|- {{#if: {{{AmmoCost|}}} | style="height: 20px;" | style="display: none;"}} | |- {{#if: {{{AmmoCost|}}} | style="height: 20px;" | style="display: none;"}} | ||
| colspan="2" style="padding | | colspan="2" style="padding: 0 0 0 12px; vertical-align: top; white-space: nowrap;" | '''Ammo Cost''' | ||
| colspan="2" style="padding | | colspan="2" style="padding: 0 12px 0 0; text-align: right;" | [[File:KF2_Dosh_Gray.png|baseline|10px|link=]] {{{AmmoCost}}} | ||
|- {{#if: {{{Block|}}} | style="height: 20px;" | style="display: none;"}} | |- {{#if: {{{Block|}}} | style="height: 20px;" | style="display: none;"}} | ||
| colspan="2" style="padding | | colspan="2" style="padding: 0 0 0 12px; vertical-align: top; white-space: nowrap;" | '''Block''' <small>(damage multiplier)</small> | ||
| colspan="2" style="padding | | colspan="2" style="padding: 0 12px 0 0; text-align: right;" | ×{{#expr: {{{Block}}} round 1}} | ||
|- {{#if: {{{Parry|}}} | style="height: 20px;" | style="display: none;"}} | |- {{#if: {{{Parry|}}} | style="height: 20px;" | style="display: none;"}} | ||
| colspan="2" style="padding | | colspan="2" style="padding: 0 0 0 12px; vertical-align: top; white-space: nowrap;" | '''Parry''' <small>(damage multiplier)</small> | ||
| colspan="2" style="padding | | colspan="2" style="padding: 0 12px 0 0; text-align: right;" | ×{{#expr: {{{Parry}}} round 1}} | ||
|- {{#if: {{{WeaponType|}}} | style="height: 20px;" | style="display: none;"}} | |- {{#if: {{{WeaponType|}}} | style="height: 20px;" | style="display: none;"}} | ||
| colspan="2" style="padding | | colspan="2" style="padding: 0 0 0 12px; vertical-align: top; white-space: nowrap;" | '''Weapon Type''' | ||
| colspan="2" style="padding | | colspan="2" style="padding: 0 12px 0 0; text-align: right;" | {{{WeaponType}}} [[File:KF2_WeaponType_{{{WeaponType}}}_Gray.png|top|20px|link=]] | ||
|- {{#if: {{{AlternativeWeaponType|}}} | style="height: 20px;" | style="display: none;"}} | |- {{#if: {{{AlternativeWeaponType|}}} | style="height: 20px;" | style="display: none;"}} | ||
| colspan="2" style="padding | | colspan="2" style="padding: 0 0 0 12px; vertical-align: top; white-space: nowrap;" | '''Alternative Weapon Type''' | ||
| colspan="2" style="padding | | colspan="2" style="padding: 0 12px 0 0; text-align: right;" | {{{AlternativeWeaponType}}} [[File:KF2_WeaponType_{{{AlternativeWeaponType}}}_Gray.png|top|20px|link=]] | ||
|- {{#ifexpr: ({{#if: {{{InitialSpareMags|}}} | 1 | 0}} or {{#if: {{{AmmoCost|}}} | 1 | 0}} or {{#if: {{{Block|}}} | 1 | 0}} or {{#if: {{{Parry|}}} | 1 | 0}} or {{#if: {{{WeaponType|}}} | 1 | 0}}) and ({{#if: {{{SecondaryAmmoType|}}} | 1 | 0}} or {{#if: {{{HealAmount|}}} | 1 | 0}} or {{#if: {{{HealAmountSolo|}}} | 1 | 0}} or {{#if: {{{HealRecharge|}}} | 1 | 0}} or {{#if: {{{HealRechargeSelf|}}} | 1 | 0}} or {{#if: {{{SecondaryMagazineSize|}}} | 1 | 0}} or {{#if: {{{SecondaryAmmoCapacity|}}} | 1 | 0}} or {{#if: {{{SecondaryAmmoConsumption|}}} | 1 | 0}} or {{#if: {{{SecondaryAmmoCost|}}} | 1 | 0}} or {{#if: {{{Custom_0_Entry|}}} | 1 | 0}} or {{#if: {{{Custom_1_Entry|}}} | 1 | 0}} or {{#if: {{{Custom_2_Entry|}}} | 1 | 0}} or {{#if: {{{Custom_3_Entry|}}} | 1 | 0}} or {{#if: {{{Custom_4_Entry|}}} | 1 | 0}} or {{#if: {{{Custom_5_Entry|}}} | 1 | 0}} or {{#if: {{{Custom_6_Entry|}}} | 1 | 0}} or {{#if: {{{Custom_7_Entry|}}} | 1 | 0}} or {{#if: {{{Custom_8_Entry|}}} | 1 | 0}} or {{#if: {{{Custom_9_Entry|}}} | 1 | 0}}) || style="display: none;"}} | |- {{#ifexpr: ({{#if: {{{InitialSpareMags|}}} | 1 | 0}} or {{#if: {{{AmmoCost|}}} | 1 | 0}} or {{#if: {{{Block|}}} | 1 | 0}} or {{#if: {{{Parry|}}} | 1 | 0}} or {{#if: {{{WeaponType|}}} | 1 | 0}}) and ({{#if: {{{SecondaryAmmoType|}}} | 1 | 0}} or {{#if: {{{HealAmount|}}} | 1 | 0}} or {{#if: {{{HealAmountSolo|}}} | 1 | 0}} or {{#if: {{{HealRecharge|}}} | 1 | 0}} or {{#if: {{{HealRechargeSelf|}}} | 1 | 0}} or {{#if: {{{SecondaryMagazineSize|}}} | 1 | 0}} or {{#if: {{{SecondaryAmmoCapacity|}}} | 1 | 0}} or {{#if: {{{SecondaryAmmoConsumption|}}} | 1 | 0}} or {{#if: {{{SecondaryAmmoCost|}}} | 1 | 0}} or {{#if: {{{Custom_0_Entry|}}} | 1 | 0}} or {{#if: {{{Custom_1_Entry|}}} | 1 | 0}} or {{#if: {{{Custom_2_Entry|}}} | 1 | 0}} or {{#if: {{{Custom_3_Entry|}}} | 1 | 0}} or {{#if: {{{Custom_4_Entry|}}} | 1 | 0}} or {{#if: {{{Custom_5_Entry|}}} | 1 | 0}} or {{#if: {{{Custom_6_Entry|}}} | 1 | 0}} or {{#if: {{{Custom_7_Entry|}}} | 1 | 0}} or {{#if: {{{Custom_8_Entry|}}} | 1 | 0}} or {{#if: {{{Custom_9_Entry|}}} | 1 | 0}}) | style="height: 6px;" | style="display: none;"}} | ||
| colspan="4" style="height: 6px;" | | | colspan="4" style="padding: 0; height: 6px;" | | ||
|- {{#if: {{{SecondaryAmmoType|}}} | style="height: 20px;" | style="display: none;"}} | |- {{#if: {{{SecondaryAmmoType|}}} | style="height: 20px;" | style="display: none;"}} | ||
| colspan="4" style="padding: 0 12px; text-align: center;" | <small>Secondary Ammunition</small> | | colspan="4" style="padding: 0 12px; text-align: center;" | <small>Secondary Ammunition</small> | ||
|- {{#if: {{{SecondaryAmmoType|}}} | style="height: 20px;" | style="display: none;"}} | |- {{#if: {{{SecondaryAmmoType|}}} | style="height: 20px;" | style="display: none;"}} | ||
| colspan="2" style="padding | | colspan="2" style="padding: 0 0 0 12px; vertical-align: top; white-space: nowrap;" | '''Ammo Type''' | ||
| colspan="2" style="padding | | colspan="2" style="padding: 0 12px 0 0; text-align: right;" | {{{SecondaryAmmoType}}} | ||
|- {{#if: {{{HealAmount|}}} | style="height: 20px;" | style="display: none;"}} | |- {{#if: {{{HealAmount|}}} | style="height: 20px;" | style="display: none;"}} | ||
| colspan="2" style="padding | | colspan="2" style="padding: 0 0 0 12px; vertical-align: top; white-space: nowrap;" | '''Heal Amount''' {{#if: {{{HealAmountSolo|}}} | <small>(coop)</small> |}} | ||
| colspan="2" style="padding | | colspan="2" style="padding: 0 12px 0 0; text-align: right;" | {{#expr: {{{HealAmount}}} round 0}} <span style="margin: 0 -1px;">✚</span> | ||
|- {{#if: {{{HealAmountSolo|}}} | style="height: 20px;" | style="display: none;"}} | |- {{#if: {{{HealAmountSolo|}}} | style="height: 20px;" | style="display: none;"}} | ||
| colspan="2" style="padding | | colspan="2" style="padding: 0 0 0 12px; vertical-align: top; white-space: nowrap;" | '''Heal Amount''' <small>(solo)</small> | ||
| colspan="2" style="padding | | colspan="2" style="padding: 0 12px 0 0; text-align: right;" | {{#expr: {{{HealAmountSolo}}} round 0}} <span style="margin: 0 -1px;">✚</span> | ||
|- {{#if: {{{HealRecharge|}}} | style="height: 20px;" | style="display: none;"}} | |- {{#if: {{{HealRecharge|}}} | style="height: 20px;" | style="display: none;"}} | ||
| colspan="2" style="padding | | colspan="2" style="padding: 0 0 0 12px; vertical-align: top; white-space: nowrap;" | '''Full Recharge Time''' | ||
| colspan="2" style="padding | | colspan="2" style="padding: 0 12px 0 0; text-align: right;" | {{#expr: {{{HealRecharge}}} round 1}}s | ||
|- {{#if: {{{HealRechargeSelf|}}} | style="height: 20px;" | style="display: none;"}} | |- {{#if: {{{HealRechargeSelf|}}} | style="height: 20px;" | style="display: none;"}} | ||
| colspan="2" style="padding | | colspan="2" style="padding: 0 0 0 12px; vertical-align: top; white-space: nowrap;" | '''Full Recharge Time''' <small>(self)</small> | ||
| colspan="2" style="padding | | colspan="2" style="padding: 0 12px 0 0; text-align: right;" | {{#expr: {{{HealRechargeSelf}}} round 1}}s | ||
|- {{#if: {{{SecondaryMagazineSize|}}} | style="height: 20px;" | style="display: none;"}} | |- {{#if: {{{SecondaryMagazineSize|}}} | style="height: 20px;" | style="display: none;"}} | ||
| colspan="2" style="padding | | colspan="2" style="padding: 0 0 0 12px; vertical-align: top; white-space: nowrap;" | '''Magazine Size''' | ||
| colspan="2" style="padding | | colspan="2" style="padding: 0 12px 0 0; text-align: right;" | {{{SecondaryMagazineSize}}} [[File:{{{SecondaryAmmoImage}}}|baseline|10px|link=]] | ||
|- {{#if: {{{SecondaryAmmoCapacity|}}} | style="height: 20px;" | style="display: none;"}} | |- {{#if: {{{SecondaryAmmoCapacity|}}} | style="height: 20px;" | style="display: none;"}} | ||
| colspan="2" style="padding | | colspan="2" style="padding: 0 0 0 12px; vertical-align: top; white-space: nowrap;" | '''Ammo Capacity''' | ||
| colspan="2" style="padding | | colspan="2" style="padding: 0 12px 0 0; text-align: right;" | {{{SecondaryAmmoCapacity}}} [[File:{{{SecondaryAmmoImage}}}|baseline|10px|link=]] | ||
|- {{#ifexpr: {{#if: {{{SecondaryMagazineSize|}}} | 1 | 0}} and {{#if: {{{SecondaryAmmoCapacity|}}} | 1 | 0}} and {{#if: {{{InitialSecondaryAmmo|}}} | 1 | 0}} | style="height: 20px;" | style="display: none;"}} | |- {{#ifexpr: {{#if: {{{SecondaryMagazineSize|}}} | 1 | 0}} and {{#if: {{{SecondaryAmmoCapacity|}}} | 1 | 0}} and {{#if: {{{InitialSecondaryAmmo|}}} | 1 | 0}} | style="height: 20px;" | style="display: none;"}} | ||
| colspan="2" style="padding | | colspan="2" style="padding: 0 0 0 12px; vertical-align: top; white-space: nowrap;" | '''Starting Ammo''' | ||
| colspan="2" style="padding | | colspan="2" style="padding: 0 12px 0 0; text-align: right;" | {{#ifexpr: {{{InitialSecondaryAmmo}}} < {{{SecondaryAmmoCapacity}}} | {{{SecondaryMagazineSize}}} + {{#expr: {{{InitialSecondaryAmmo}}} - {{{SecondaryMagazineSize}}}}} | {{{InitialSecondaryAmmo}}}}} [[File:{{{SecondaryAmmoImage}}}|baseline|10px|link=]] | ||
|- {{#if: {{{SecondaryAmmoConsumption|}}} | {{#ifexpr: {{{SecondaryAmmoConsumption|}}} < {{{SecondaryMagazineSize}}} | style="height: 20px;"| style="display: none;"}} | style="display: none;"}} | |- {{#if: {{{SecondaryAmmoConsumption|}}} | {{#ifexpr: {{{SecondaryAmmoConsumption|}}} < {{{SecondaryMagazineSize}}} | style="height: 20px;"| style="display: none;"}} | style="display: none;"}} | ||
| colspan="2" style="padding | | colspan="2" style="padding: 0 0 0 12px; vertical-align: top; white-space: nowrap;" | '''Ammo Consumption''' <small>(per use)</small> | ||
| colspan="2" style="padding | | colspan="2" style="padding: 0 12px 0 0; text-align: right;" | {{#expr: {{{SecondaryAmmoConsumption}}} round 0}} [[File:{{{SecondaryAmmoImage}}}|baseline|10px|link=]] | ||
|- {{#if: {{{SecondaryAmmoCost|}}} | style="height: 20px;" | style="display: none;"}} | |- {{#if: {{{SecondaryAmmoCost|}}} | style="height: 20px;" | style="display: none;"}} | ||
| colspan="2" style="padding | | colspan="2" style="padding: 0 0 0 12px; vertical-align: top; white-space: nowrap;" | '''Ammo Cost''' | ||
| colspan="2" style="padding | | colspan="2" style="padding: 0 12px 0 0; text-align: right;" | [[File:KF2_Dosh_Gray.png|baseline|10px|link=]] {{{SecondaryAmmoCost}}} | ||
|- {{#if: {{{Custom_0_Entry|}}} | style="height: 20px;" | style="display: none;"}} | |- {{#if: {{{Custom_0_Entry|}}} | style="height: 20px;" | style="display: none;"}} | ||
| colspan="2" style="padding | | colspan="2" style="padding: 0 0 0 12px; vertical-align: top; white-space: nowrap;" | {{{Custom_0_Entry}}} | ||
| colspan="2" style="padding | | colspan="2" style="padding: 0 12px 0 0; text-align: right;" | {{{Custom_0_Value}}} | ||
|- {{#if: {{{Custom_1_Entry|}}} | style="height: 20px;" | style="display: none;"}} | |- {{#if: {{{Custom_1_Entry|}}} | style="height: 20px;" | style="display: none;"}} | ||
| colspan="2" style="padding | | colspan="2" style="padding: 0 0 0 12px; vertical-align: top; white-space: nowrap;" | {{{Custom_1_Entry}}} | ||
| colspan="2" style="padding | | colspan="2" style="padding: 0 12px 0 0; text-align: right;" | {{{Custom_1_Value}}} | ||
|- {{#if: {{{Custom_2_Entry|}}} | style="height: 20px;" | style="display: none;"}} | |- {{#if: {{{Custom_2_Entry|}}} | style="height: 20px;" | style="display: none;"}} | ||
| colspan="2" style="padding | | colspan="2" style="padding: 0 0 0 12px; vertical-align: top; white-space: nowrap;" | {{{Custom_2_Entry}}} | ||
| colspan="2" style="padding | | colspan="2" style="padding: 0 12px 0 0; text-align: right;" | {{{Custom_2_Value}}} | ||
|- {{#if: {{{Custom_3_Entry|}}} | style="height: 20px;" | style="display: none;"}} | |- {{#if: {{{Custom_3_Entry|}}} | style="height: 20px;" | style="display: none;"}} | ||
| colspan="2" style="padding | | colspan="2" style="padding: 0 0 0 12px; vertical-align: top; white-space: nowrap;" | {{{Custom_3_Entry}}} | ||
| colspan="2" style="padding | | colspan="2" style="padding: 0 12px 0 0; text-align: right;" | {{{Custom_3_Value}}} | ||
|- {{#if: {{{Custom_4_Entry|}}} | style="height: 20px;" | style="display: none;"}} | |- {{#if: {{{Custom_4_Entry|}}} | style="height: 20px;" | style="display: none;"}} | ||
| colspan="2" style="padding | | colspan="2" style="padding: 0 0 0 12px; vertical-align: top; white-space: nowrap;" | {{{Custom_4_Entry}}} | ||
| colspan="2" style="padding | | colspan="2" style="padding: 0 12px 0 0; text-align: right;" | {{{Custom_4_Value}}} | ||
|- {{#if: {{{Custom_5_Entry|}}} | style="height: 20px;" | style="display: none;"}} | |- {{#if: {{{Custom_5_Entry|}}} | style="height: 20px;" | style="display: none;"}} | ||
| colspan="2" style="padding | | colspan="2" style="padding: 0 0 0 12px; vertical-align: top; white-space: nowrap;" | {{{Custom_5_Entry}}} | ||
| colspan="2" style="padding | | colspan="2" style="padding: 0 12px 0 0; text-align: right;" | {{{Custom_5_Value}}} | ||
|- {{#if: {{{Custom_6_Entry|}}} | style="height: 20px;" | style="display: none;"}} | |- {{#if: {{{Custom_6_Entry|}}} | style="height: 20px;" | style="display: none;"}} | ||
| colspan="2" style="padding | | colspan="2" style="padding: 0 0 0 12px; vertical-align: top; white-space: nowrap;" | {{{Custom_6_Entry}}} | ||
| colspan="2" style="padding | | colspan="2" style="padding: 0 12px 0 0; text-align: right;" | {{{Custom_6_Value}}} | ||
|- {{#if: {{{Custom_7_Entry|}}} | style="height: 20px;" | style="display: none;"}} | |- {{#if: {{{Custom_7_Entry|}}} | style="height: 20px;" | style="display: none;"}} | ||
| colspan="2" style="padding | | colspan="2" style="padding: 0 0 0 12px; vertical-align: top; white-space: nowrap;" | {{{Custom_7_Entry}}} | ||
| colspan="2" style="padding | | colspan="2" style="padding: 0 12px 0 0; text-align: right;" | {{{Custom_7_Value}}} | ||
|- {{#if: {{{Custom_8_Entry|}}} | style="height: 20px;" | style="display: none;"}} | |- {{#if: {{{Custom_8_Entry|}}} | style="height: 20px;" | style="display: none;"}} | ||
| colspan="2" style="padding | | colspan="2" style="padding: 0 0 0 12px; vertical-align: top; white-space: nowrap;" | {{{Custom_8_Entry}}} | ||
| colspan="2" style="padding | | colspan="2" style="padding: 0 12px 0 0; text-align: right;" | {{{Custom_8_Value}}} | ||
|- {{#if: {{{Custom_9_Entry|}}} | style="height: 20px;" | style="display: none;"}} | |- {{#if: {{{Custom_9_Entry|}}} | style="height: 20px;" | style="display: none;"}} | ||
| colspan="2" style="padding | | colspan="2" style="padding: 0 0 0 12px; vertical-align: top; white-space: nowrap;" | {{{Custom_9_Entry}}} | ||
| colspan="2" style="padding | | colspan="2" style="padding: 0 12px 0 0; text-align: right;" | {{{Custom_9_Value}}} | ||
|- {{#ifexpr: {{#if: {{{InitialSpareMags|}}} | 1 | 0}} or {{#if: {{{AmmoCost|}}} | 1 | 0}} or {{#if: {{{Block|}}} | 1 | 0}} or {{#if: {{{Parry|}}} | 1 | 0}} or {{#if: {{{HealAmount|}}} | 1 | 0}} or {{#if: {{{HealAmountSolo|}}} | 1 | 0}} or {{#if: {{{HealRecharge|}}} | 1 | 0}} or {{#if: {{{HealRechargeSelf|}}} | 1 | 0}} or {{#if: {{{WeaponType|}}} | 1 | 0}} or {{#if: {{{SecondaryMagazineSize|}}} | 1 | 0}} or {{#if: {{{SecondaryAmmoCapacity|}}} | 1 | 0}} or {{#if: {{{SecondaryAmmoImage|}}} | 1 | 0}} or {{#if: {{{SecondaryAmmoConsumption|}}} | 1 | 0}} or {{#if: {{{SecondaryAmmoCost|}}} | 1 | 0}} or {{#if: {{{Custom_0_Entry|}}} | 1 | 0}} or {{#if: {{{Custom_1_Entry|}}} | 1 | 0}} or {{#if: {{{Custom_2_Entry|}}} | 1 | 0}} or {{#if: {{{Custom_3_Entry|}}} | 1 | 0}} or {{#if: {{{Custom_4_Entry|}}} | 1 | 0}} or {{#if: {{{Custom_5_Entry|}}} | 1 | 0}} or {{#if: {{{Custom_6_Entry|}}} | 1 | 0}} or {{#if: {{{Custom_7_Entry|}}} | 1 | 0}} or {{#if: {{{Custom_8_Entry|}}} | 1 | 0}} or {{#if: {{{Custom_9_Entry|}}} | 1 | 0}} || style="display: none;"}} | |- {{#ifexpr: {{#if: {{{InitialSpareMags|}}} | 1 | 0}} or {{#if: {{{AmmoCost|}}} | 1 | 0}} or {{#if: {{{Block|}}} | 1 | 0}} or {{#if: {{{Parry|}}} | 1 | 0}} or {{#if: {{{HealAmount|}}} | 1 | 0}} or {{#if: {{{HealAmountSolo|}}} | 1 | 0}} or {{#if: {{{HealRecharge|}}} | 1 | 0}} or {{#if: {{{HealRechargeSelf|}}} | 1 | 0}} or {{#if: {{{WeaponType|}}} | 1 | 0}} or {{#if: {{{SecondaryMagazineSize|}}} | 1 | 0}} or {{#if: {{{SecondaryAmmoCapacity|}}} | 1 | 0}} or {{#if: {{{SecondaryAmmoImage|}}} | 1 | 0}} or {{#if: {{{SecondaryAmmoConsumption|}}} | 1 | 0}} or {{#if: {{{SecondaryAmmoCost|}}} | 1 | 0}} or {{#if: {{{Custom_0_Entry|}}} | 1 | 0}} or {{#if: {{{Custom_1_Entry|}}} | 1 | 0}} or {{#if: {{{Custom_2_Entry|}}} | 1 | 0}} or {{#if: {{{Custom_3_Entry|}}} | 1 | 0}} or {{#if: {{{Custom_4_Entry|}}} | 1 | 0}} or {{#if: {{{Custom_5_Entry|}}} | 1 | 0}} or {{#if: {{{Custom_6_Entry|}}} | 1 | 0}} or {{#if: {{{Custom_7_Entry|}}} | 1 | 0}} or {{#if: {{{Custom_8_Entry|}}} | 1 | 0}} or {{#if: {{{Custom_9_Entry|}}} | 1 | 0}} || style="display: none;"}} | ||
| colspan="4" style="height: 6px;" | | | colspan="4" style="padding: 0; height: 6px;" | | ||
|- {{#ifexpr: {{#if: {{{Achievement_0_Name|}}} | 1 | 0}} or {{#if: {{{Achievement_1_Name|}}} | 1 | 0}} or {{#if: {{{Achievement_2_Name|}}} | 1 | 0}} or {{#if: {{{Achievement_3_Name|}}} | 1 | 0}} or {{#if: {{{Achievement_4_Name|}}} | 1 | 0}} or {{#if: {{{Achievement_5_Name|}}} | 1 | 0}} or {{#if: {{{Achievement_6_Name|}}} | 1 | 0}} or {{#if: {{{Achievement_7_Name|}}} | 1 | 0}} or {{#if: {{{Achievement_8_Name|}}} | 1 | 0}} or {{#if: {{{Achievement_9_Name|}}} | 1 | 0}} | style="background: # | |- {{#ifexpr: {{#if: {{{Achievement_0_Name|}}} | 1 | 0}} or {{#if: {{{Achievement_1_Name|}}} | 1 | 0}} or {{#if: {{{Achievement_2_Name|}}} | 1 | 0}} or {{#if: {{{Achievement_3_Name|}}} | 1 | 0}} or {{#if: {{{Achievement_4_Name|}}} | 1 | 0}} or {{#if: {{{Achievement_5_Name|}}} | 1 | 0}} or {{#if: {{{Achievement_6_Name|}}} | 1 | 0}} or {{#if: {{{Achievement_7_Name|}}} | 1 | 0}} or {{#if: {{{Achievement_8_Name|}}} | 1 | 0}} or {{#if: {{{Achievement_9_Name|}}} | 1 | 0}} | style="background: #000000; color: #ffffff; text-align: center;" | style="display: none;"}} | ||
| colspan="4" style=" | | colspan="4" style="padding: 0; background: linear-gradient(transparent 50%, #202224 50%), linear-gradient(135deg, transparent 5px, #bd0000 0, #bd0000 60%, transparent 60%) top left, linear-gradient(225deg, transparent 5px, #bd0000 0, #bd0000 60%, transparent 60%) top right; vertical-align: top; position: relative; top: 2px; height: 43px; width: 100%;" | <div style="background: linear-gradient(135deg, transparent 5px, #202224 0, #202224 60%, transparent 60%) top left, linear-gradient(225deg, transparent 5px, #202224 0, #202224 60%, transparent 60%) top right; display: table; padding: 0; position: relative; left: 0; top: 5px; height: 30px; width: 350px;"><div style="display: table-cell; vertical-align: middle;">'''Related Achievements'''</div></div><div style="background: linear-gradient(135deg, transparent 5px, #000000 0, #000000 60%, transparent 60%) top left, linear-gradient(225deg, transparent 5px, #000000 0, #000000 60%, transparent 60%) top right; height: 8px; left: 0; position: absolute; top: 35px; width: 100%;"></div> | ||
|- {{#if: {{{Achievement_0_Name|}}} | style="height: 30px;" | style="display: none;"}} | |- {{#if: {{{Achievement_0_Name|}}} | style="height: 30px;" | style="display: none;"}} | ||
| colspan="4" style="padding: 0 12px;" | <div style="overflow: hidden; text-overflow: ellipsis; vertical-align: top; white-space: nowrap; width: 326px;"><span style="margin | | colspan="4" style="padding: 0 12px;" | <div style="overflow: hidden; text-overflow: ellipsis; vertical-align: top; white-space: nowrap; width: 326px;"><span style="margin: 0 6px 0 0;">[[File:{{#if: {{{Achievement_0_Image}}}|{{{Achievement_0_Image}}}|KF2_Achievement_Locked.jpg}}|middle|24px|link=]]</span> [[Achievements (Killing Floor 2)#{{{Achievement_0_Name}}}|<span style="color: #a6a7a9;">{{{Achievement_0_Name}}}</span>]]</div> | ||
|- {{#if: {{{Achievement_1_Name|}}} | style="height: 30px;" | style="display: none;"}} | |- {{#if: {{{Achievement_1_Name|}}} | style="height: 30px;" | style="display: none;"}} | ||
| colspan="4" style="padding: 0 12px;" | <div style="overflow: hidden; text-overflow: ellipsis; vertical-align: top; white-space: nowrap; width: 326px;"><span style="margin | | colspan="4" style="padding: 0 12px;" | <div style="overflow: hidden; text-overflow: ellipsis; vertical-align: top; white-space: nowrap; width: 326px;"><span style="margin: 0 6px 0 0;">[[File:{{#if: {{{Achievement_1_Image}}}|{{{Achievement_1_Image}}}|KF2_Achievement_Locked.jpg}}|middle|24px|link=]]</span> [[Achievements (Killing Floor 2)#{{{Achievement_1_Name}}}|<span style="color: #a6a7a9;">{{{Achievement_1_Name}}}</span>]]</div> | ||
|- {{#if: {{{Achievement_2_Name|}}} | style="height: 30px;" | style="display: none;"}} | |- {{#if: {{{Achievement_2_Name|}}} | style="height: 30px;" | style="display: none;"}} | ||
| colspan="4" style="padding: 0 12px;" | <div style="overflow: hidden; text-overflow: ellipsis; vertical-align: top; white-space: nowrap; width: 326px;"><span style="margin | | colspan="4" style="padding: 0 12px;" | <div style="overflow: hidden; text-overflow: ellipsis; vertical-align: top; white-space: nowrap; width: 326px;"><span style="margin: 0 6px 0 0;">[[File:{{#if: {{{Achievement_2_Image}}}|{{{Achievement_2_Image}}}|KF2_Achievement_Locked.jpg}}|middle|24px|link=]]</span> [[Achievements (Killing Floor 2)#{{{Achievement_2_Name}}}|<span style="color: #a6a7a9;">{{{Achievement_2_Name}}}</span>]]</div> | ||
|- {{#if: {{{Achievement_3_Name|}}} | style="height: 30px;" | style="display: none;"}} | |- {{#if: {{{Achievement_3_Name|}}} | style="height: 30px;" | style="display: none;"}} | ||
| colspan="4" style="padding: 0 12px;" | <div style="overflow: hidden; text-overflow: ellipsis; vertical-align: top; white-space: nowrap; width: 326px;"><span style="margin | | colspan="4" style="padding: 0 12px;" | <div style="overflow: hidden; text-overflow: ellipsis; vertical-align: top; white-space: nowrap; width: 326px;"><span style="margin: 0 6px 0 0;">[[File:{{#if: {{{Achievement_3_Image}}}|{{{Achievement_3_Image}}}|KF2_Achievement_Locked.jpg}}|middle|24px|link=]]</span> [[Achievements (Killing Floor 2)#{{{Achievement_3_Name}}}|<span style="color: #a6a7a9;">{{{Achievement_3_Name}}}</span>]]</div> | ||
|- {{#if: {{{Achievement_4_Name|}}} | style="height: 30px;" | style="display: none;"}} | |- {{#if: {{{Achievement_4_Name|}}} | style="height: 30px;" | style="display: none;"}} | ||
| colspan="4" style="padding: 0 12px;" | <div style="overflow: hidden; text-overflow: ellipsis; vertical-align: top; white-space: nowrap; width: 326px;"><span style="margin | | colspan="4" style="padding: 0 12px;" | <div style="overflow: hidden; text-overflow: ellipsis; vertical-align: top; white-space: nowrap; width: 326px;"><span style="margin: 0 6px 0 0;">[[File:{{#if: {{{Achievement_4_Image}}}|{{{Achievement_4_Image}}}|KF2_Achievement_Locked.jpg}}|middle|24px|link=]]</span> [[Achievements (Killing Floor 2)#{{{Achievement_4_Name}}}|<span style="color: #a6a7a9;">{{{Achievement_4_Name}}}</span>]]</div> | ||
|- {{#if: {{{Achievement_5_Name|}}} | style="height: 30px;" | style="display: none;"}} | |- {{#if: {{{Achievement_5_Name|}}} | style="height: 30px;" | style="display: none;"}} | ||
| colspan="4" style="padding: 0 12px;" | <div style="overflow: hidden; text-overflow: ellipsis; vertical-align: top; white-space: nowrap; width: 326px;"><span style="margin | | colspan="4" style="padding: 0 12px;" | <div style="overflow: hidden; text-overflow: ellipsis; vertical-align: top; white-space: nowrap; width: 326px;"><span style="margin: 0 6px 0 0;">[[File:{{#if: {{{Achievement_5_Image}}}|{{{Achievement_5_Image}}}|KF2_Achievement_Locked.jpg}}|middle|24px|link=]]</span> [[Achievements (Killing Floor 2)#{{{Achievement_5_Name}}}|<span style="color: #a6a7a9;">{{{Achievement_5_Name}}}</span>]]</div> | ||
|- {{#if: {{{Achievement_6_Name|}}} | style="height: 30px;" | style="display: none;"}} | |- {{#if: {{{Achievement_6_Name|}}} | style="height: 30px;" | style="display: none;"}} | ||
| colspan="4" style="padding: 0 12px;" | <div style="overflow: hidden; text-overflow: ellipsis; vertical-align: top; white-space: nowrap; width: 326px;"><span style="margin | | colspan="4" style="padding: 0 12px;" | <div style="overflow: hidden; text-overflow: ellipsis; vertical-align: top; white-space: nowrap; width: 326px;"><span style="margin: 0 6px 0 0;">[[File:{{#if: {{{Achievement_6_Image}}}|{{{Achievement_6_Image}}}|KF2_Achievement_Locked.jpg}}|middle|24px|link=]]</span> [[Achievements (Killing Floor 2)#{{{Achievement_6_Name}}}|<span style="color: #a6a7a9;">{{{Achievement_6_Name}}}</span>]]</div> | ||
|- {{#if: {{{Achievement_7_Name|}}} | style="height: 30px;" | style="display: none;"}} | |- {{#if: {{{Achievement_7_Name|}}} | style="height: 30px;" | style="display: none;"}} | ||
| colspan="4" style="padding: 0 12px;" | <div style="overflow: hidden; text-overflow: ellipsis; vertical-align: top; white-space: nowrap; width: 326px;"><span style="margin | | colspan="4" style="padding: 0 12px;" | <div style="overflow: hidden; text-overflow: ellipsis; vertical-align: top; white-space: nowrap; width: 326px;"><span style="margin: 0 6px 0 0;">[[File:{{#if: {{{Achievement_7_Image}}}|{{{Achievement_7_Image}}}|KF2_Achievement_Locked.jpg}}|middle|24px|link=]]</span> [[Achievements (Killing Floor 2)#{{{Achievement_7_Name}}}|<span style="color: #a6a7a9;">{{{Achievement_7_Name}}}</span>]]</div> | ||
|- {{#if: {{{Achievement_8_Name|}}} | style="height: 30px;" | style="display: none;"}} | |- {{#if: {{{Achievement_8_Name|}}} | style="height: 30px;" | style="display: none;"}} | ||
| colspan="4" style="padding: 0 12px;" | <div style="overflow: hidden; text-overflow: ellipsis; vertical-align: top; white-space: nowrap; width: 326px;"><span style="margin | | colspan="4" style="padding: 0 12px;" | <div style="overflow: hidden; text-overflow: ellipsis; vertical-align: top; white-space: nowrap; width: 326px;"><span style="margin: 0 6px 0 0;">[[File:{{#if: {{{Achievement_8_Image}}}|{{{Achievement_8_Image}}}|KF2_Achievement_Locked.jpg}}|middle|24px|link=]]</span> [[Achievements (Killing Floor 2)#{{{Achievement_8_Name}}}|<span style="color: #a6a7a9;">{{{Achievement_8_Name}}}</span>]]</div> | ||
|- {{#if: {{{Achievement_9_Name|}}} | style="height: 30px;" | style="display: none;"}} | |- {{#if: {{{Achievement_9_Name|}}} | style="height: 30px;" | style="display: none;"}} | ||
| colspan="4" style="padding: 0 12px;" | <div style="overflow: hidden; text-overflow: ellipsis; vertical-align: top; white-space: nowrap; width: 326px;"><span style="margin | | colspan="4" style="padding: 0 12px;" | <div style="overflow: hidden; text-overflow: ellipsis; vertical-align: top; white-space: nowrap; width: 326px;"><span style="margin: 0 6px 0 0;">[[File:{{#if: {{{Achievement_9_Image}}}|{{{Achievement_9_Image}}}|KF2_Achievement_Locked.jpg}}|middle|24px|link=]]</span> [[Achievements (Killing Floor 2)#{{{Achievement_9_Name}}}|<span style="color: #a6a7a9;">{{{Achievement_9_Name}}}</span>]]</div> | ||
|- {{#ifexpr: {{#if: {{{Achievement_0_Name|}}} | 1 | 0}} or {{#if: {{{Achievement_1_Name|}}} | 1 | 0}} or {{#if: {{{Achievement_2_Name|}}} | 1 | 0}} or {{#if: {{{Achievement_3_Name|}}} | 1 | 0}} or {{#if: {{{Achievement_4_Name|}}} | 1 | 0}} or {{#if: {{{Achievement_5_Name|}}} | 1 | 0}} or {{#if: {{{Achievement_6_Name|}}} | 1 | 0}} or {{#if: {{{Achievement_7_Name|}}} | 1 | 0}} or {{#if: {{{Achievement_8_Name|}}} | 1 | 0}} or {{#if: {{{Achievement_9_Name|}}} | 1 | 0}} || style="display: none;"}} | |- {{#ifexpr: {{#if: {{{Achievement_0_Name|}}} | 1 | 0}} or {{#if: {{{Achievement_1_Name|}}} | 1 | 0}} or {{#if: {{{Achievement_2_Name|}}} | 1 | 0}} or {{#if: {{{Achievement_3_Name|}}} | 1 | 0}} or {{#if: {{{Achievement_4_Name|}}} | 1 | 0}} or {{#if: {{{Achievement_5_Name|}}} | 1 | 0}} or {{#if: {{{Achievement_6_Name|}}} | 1 | 0}} or {{#if: {{{Achievement_7_Name|}}} | 1 | 0}} or {{#if: {{{Achievement_8_Name|}}} | 1 | 0}} or {{#if: {{{Achievement_9_Name|}}} | 1 | 0}} || style="display: none;"}} | ||
| colspan="4" style="height: 6px;" | | | colspan="4" style="padding: 0; height: 6px;" | | ||
|- style="background: #ffffff; text-align: | |- style="background: #ffffff; text-align: center;" | ||
| colspan="4" style=" | | colspan="4" style="padding: 0 0 2px; height: 8px;" | <div style="background: linear-gradient(45deg, #ffffff 5px, #000000 0, #000000 60%, transparent 60%) bottom left, linear-gradient(315deg, #ffffff 5px, #000000 0, #000000 60%, transparent 60%) bottom right; height: 8px; position: relative; top: -8px; width: 350px;"></div>{{#if: {{{GameVersion|}}} |<small style="position: relative; top: -8px;>''status as of [[Updates (Killing Floor 2)|<span style="color: #a6a7a9;">game version {{{GameVersion}}}''</span>]]</small>|}} | ||
|}</includeonly> | |}</includeonly> | ||
<noinclude> | <noinclude> | ||
Revision as of 02:20, 12 October 2016
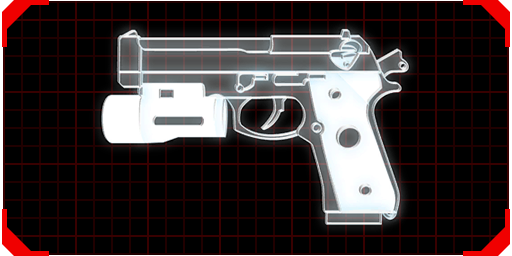
| Killing Floor 2 item | |||
9mm Pistol | |||

| |||
| Magazine Size | 15 | ||
| Ammo Capacity | 225 | ||
| Damage | 15 | ||
| Fire Rate | 343 | ||
| Accuracy | 50 | ||
| Penetration | 0 | ||
| • Fire mode is semi-auto only. • This is the standard 9mm pistol. Simple and cheap (very cheap, frankly, to you), it is the basic sidearm for all Horzine operatives. | |||
General Information | |||
| Perk | All | ||
| Pricing | |||
| Weight | |||
Weapon Information | |||
| Starting Ammo | 15 + 105 | ||
| Ammo Cost | |||
| Block (damage multiplier) | ×1 | ||
| Parry (damage multiplier) | ×1 | ||
| Weapon Type | Pistol | ||
| Alternative Weapon Type | Electric Weapon | ||
| Secondary Ammunition | |||
| Ammo Type | M203 Grenade | ||
| Heal Amount (coop) | 0 ✚ | ||
| Heal Amount (solo) | 0 ✚ | ||
| Full Recharge Time | 0s | ||
| Full Recharge Time (self) | 0s | ||
| Magazine Size | 1 | ||
| Ammo Capacity | 12 | ||
| Starting Ammo | 1 + 3 | ||
| Ammo Consumption (per use) | 0 | ||
| Ammo Cost | |||
| Heal Amount (per second) | 5 ✚ | ||
| Heal Duration | 8s | ||
Related Achievements | |||
| status as of game version 1042 | |||
Syntax
Parameters
| {{KF2WeaponInfo | |||||
|
| |||||
| | Name= | Name of the weapon | Example: | 9mm Pistol | ||
|
| |||||
| | PerkImage= | Name of the image of the corresponding perk | Example: | KF2_No_Perk_White.png | ||
|
| |||||
| | PerkLink= | Name of the page of the corresponding perk | Example: | Perks (Killing Floor 2) | ||
|
| |||||
| | WeaponImage= | Name of the image of the corresponding weapon | Example: | KF29mm Pistol.png | ||
|
| |||||
| | MagazineSize= | Magazine capacity | Example: | 15 | ||
|
| |||||
| | AmmoCapacity= | Maximum spare ammo | Example: | 225 | ||
|
| |||||
| | Damage= | Damage value of the weapon | Example: | 15.000000 | ||
|
| |||||
| | FireRate= | Fire Rate value of the weapon | Example: | 342.857147 | ||
|
| |||||
| | Accuracy= | Accuracy value of the weapon | Example: | 50.000000 | ||
|
| |||||
| | Penetration= | Penetration value of the weapon | Example: | 0.000000 | ||
|
| |||||
| | Description= | Trader descripton of the weapon | Example: | • Fire mode is semi-auto only. • This is the standard 9mm pistol. Simple and cheap (very cheap, frankly, to you), it is the basic sidearm for all Horzine operatives. | ||
|
| |||||
| | | |||||
|
| |||||
| | PerkName= | Name of the corresponding perk | Example: | All | ||
|
| |||||
| | Pricing= | How much the weapon costs at the trader | Example: | 0 | ||
|
| |||||
| | Weight= | How much the weapon weights | Example: | 0 | ||
|
| |||||
| | | |||||
|
| |||||
| | InitialSpareMags= | How much spare magazines you have Displays "Starting Ammo" |
Example: | 7 | ||
|
| |||||
| | AmmoCost= | How much one magazine costs | Example: | 8 | ||
|
| |||||
| | Block= | Damage multiplier while blocking | Example: | 1 | ||
|
| |||||
| | Parry= | Damage multiplier while parrying | Example: | 1 | ||
|
| |||||
| | WeaponType= | The weapons weapon type | Example: | Pistol | ||
|
| |||||
| | AlternativeWeaponType= | The weapons alternative weapon type | Example: | Electric Weapon | ||
|
| |||||
| | | |||||
|
| |||||
| | SecondaryAmmoType= | Ammo Type of the secondary Ammunition | Example: | M203 Grenade | ||
|
| |||||
| | SecondaryAmmoImage= | Name of the Image of the corresponding Ammo Type | Example: | KF2_SecondaryAmmo_Grenade_Gray.png | ||
|
| |||||
| | HealAmount= | How much the Healing Dart heals other players | Example: | 0 | ||
|
| |||||
| | HealAmountSolo= | How much you heal yourself (Syringe only) | Example: | 0 | ||
|
| |||||
| | HealRecharge= | How long it takes until the Healing Dart / Syringe is fully charged after healing other players | Example: | 0 | ||
|
| |||||
| | HealRechargeSelf= | How long it takes until the Syringe is fully charged after healing yourself (Syringe only) | Example: | 0 | ||
|
| |||||
| | SecondaryMagazineSize= | Magazine Size of the secondary Ammo Type | Example: | 1 | ||
|
| |||||
| | SecondaryAmmoCapacity= | Maximum ammo of the secondary Ammo Type | Example: | 12 | ||
|
| |||||
| | InitialSecondaryAmmo= | Initial ammo of the secondary Ammo Type | Example: | 4 | ||
|
| |||||
| | SecondaryAmmoConsumption= | How much ammo it takes to use one shot / attack with the weapon | Example: | 0 | ||
|
| |||||
| | SecondaryAmmoCost= | How much one magazine costs of the secondary Ammo Type | Example: | 13 | ||
|
| |||||
| | | |||||
|
| |||||
| | Custom_0_Entry= | Additional custom entries | Example: | '''Heal Amount''' <small>(per second)</small> | ||
|
| |||||
| | Custom_0_Value= | Additional custom values | Example: | 5 <span style="margin: 0 -1px;">✚</span> | ||
|
| |||||
| | Custom_1_Entry= | |||||
|
| |||||
| | Custom_1_Value= | |||||
|
| |||||
| | . | . | . |
. . . |
. . . | |||
|
| |||||
| | Custom_9_Entry= | |||||
|
| |||||
| | Custom_9_Value= | |||||
|
| |||||
| | | |||||
|
| |||||
| | Achievement_0_Image= | Name of the image of the corresponding achievement | Example: | KF2_Achievement_109.jpg | ||
|
| |||||
| | Achievement_0_Name= | Name of the achievement the weapon is related to | Example: | School's Out Forever | ||
|
| |||||
| | Achievement_1_Image= | |||||
|
| |||||
| | Achievement_1_Name= | |||||
|
| |||||
| | . | . | . |
. . . |
. . . | |||
|
| |||||
| | Achievement_9_Image= | |||||
|
| |||||
| | Achievement_9_Name= | |||||
|
| |||||
| | | |||||
|
| |||||
| | GameVersion= | Version of Killing Floor 2 these stats are taken from | Example: | 1042 | ||
|
| |||||
| }} | |||||
Weapon Types
There are 10 specific choices for this section.
| Weapon Type | Corresponding Image |
|---|---|
| Pistol | |
| Shotgun | |
| Rifle | |
| Projectile | |
| Flame Weapon | |
| Electric Weapon | |
| Explosive | |
| Assault Rifle | |
| Melee Weapon | |
| SMG |
Template
Copy this template for quick usage.
{{KF2WeaponInfo
| Name=
| PerkImage=
| PerkLink=
| WeaponImage=
| MagazineSize=
| AmmoCapacity=
| Damage=
| FireRate=
| Accuracy=
| Penetration=
| Description=
|
| PerkName=
| Pricing=
| Weight=
|
| InitialSpareMags=
| AmmoCost=
| Block=
| Parry=
| WeaponType=
| AlternativeWeaponType=
|
| SecondaryAmmoType=
| SecondaryAmmoImage=
| HealAmount=
| HealAmountSolo=
| HealRecharge=
| HealRechargeSelf=
| SecondaryMagazineSize=
| SecondaryAmmoCapacity=
| InitialSecondaryAmmo=
| SecondaryAmmoConsumption=
| SecondaryAmmoCost=
|
| Custom_0_Entry=
| Custom_0_Value=
| Custom_1_Entry=
| Custom_1_Value=
| Custom_2_Entry=
| Custom_2_Value=
| Custom_3_Entry=
| Custom_3_Value=
| Custom_4_Entry=
| Custom_4_Value=
| Custom_5_Entry=
| Custom_5_Value=
| Custom_6_Entry=
| Custom_6_Value=
| Custom_7_Entry=
| Custom_7_Value=
| Custom_8_Entry=
| Custom_8_Value=
| Custom_9_Entry=
| Custom_9_Value=
|
| Achievement_0_Image=
| Achievement_0_Name=
| Achievement_1_Image=
| Achievement_1_Name=
| Achievement_2_Image=
| Achievement_2_Name=
| Achievement_3_Image=
| Achievement_3_Name=
| Achievement_4_Image=
| Achievement_4_Name=
| Achievement_5_Image=
| Achievement_5_Name=
| Achievement_6_Image=
| Achievement_6_Name=
| Achievement_7_Image=
| Achievement_7_Name=
| Achievement_8_Image=
| Achievement_8_Name=
| Achievement_9_Image=
| Achievement_9_Name=
|
| GameVersion=
}}