Template:KF2WeaponInfo: Difference between revisions
Jump to navigation
Jump to search
(Fixed "space above the General Information section isn't displayed properly") |
(Changed design to match the newest trader UI changes, added custom entries & values, removed one-time-only entries like medic-grenade-specific entries (moved functionality to custom entries)) |
||
| Line 1: | Line 1: | ||
<includeonly>{|style="background: #000000; border-collapse: collapse; color: #a6a7a9; float: right; margin: 0 0 24px | <includeonly>{|style="background: #000000; border-collapse: collapse; color: #a6a7a9; float: right; margin: 0 0 12px 24px; text-align: left; vertical-align: middle; width: 350px;" | ||
|- style="background: #ffffff; color: #000000; text-align: center;" | |||
| colspan="4" style="padding: 0 0 2px;" | <small>''[[Killing Floor 2]] item''</small> | |||
|- style="background: #ffffff; color: #ffffff; text-align: center;" | |||
| colspan="4" style="padding: 0;" | <div style="background: linear-gradient(transparent 50%, #202224 50%), linear-gradient(135deg, transparent 4px, #bd0000 0, #bd0000 60%, transparent 60%) top left, linear-gradient(225deg, transparent 4px, #bd0000 0, #bd0000 60%, transparent 60%) top right; height: 41px; position: relative; width: 350px;"><div style="background: linear-gradient(135deg, transparent 4px, #202224 0, #202224 60%, transparent 60%) top left, linear-gradient(225deg, transparent 4px, #202224 0, #202224 60%, transparent 60%) top right; display: table-cell; height: 30px; left: 0; position: relative; top: 5px; vertical-align: middle; width: 350px;">'''{{{Name}}}'''<div style="position: absolute; top: 3px; left: 12px;">[[File:{{{PerkImage}}}|20px|link={{#if: {{{PerkLink|}}}|{{{PerkLink}}}|}}]]</div></div><div style="background: linear-gradient(135deg, transparent 4px, #000000 0, #000000 60%, transparent 60%) top left, linear-gradient(225deg, transparent 4px, #000000 0, #000000 60%, transparent 60%) top right; height: 6px; left: 0; position: absolute; top: 35px; width: 350px"></div></div> | |||
|- style="text-align: center;" | |- style="text-align: center;" | ||
| colspan="4" style="padding: | | colspan="4" style="padding: 0 12px 12px;" | [[File:{{{WeaponImage}}}|326px]] | ||
|- style="background: #202224; | |- {{#if: {{{MagazineSize|}}} | style="background: #202224; font-size: 125%; height: 30px;" | style="display: none;"}} | ||
| colspan=" | | colspan="2" style="padding-left: 12px;" | Magazine Size | ||
| | | colspan="2" style="padding-right: 12px; text-align: right;" | {{{MagazineSize}}} [[File:KF2_Magazine_Gray.png|baseline|13px|link=]] | ||
| colspan="4" style=" | |- {{#if: {{{AmmoCapacity|}}} | style="background: #202224; font-size: 125%; height: 30px;" | style="display: none;"}} | ||
| colspan="2" style="padding-left: 12px;" | Ammo Capacity | |||
| colspan="2" style="padding-right: 12px; text-align: right;" | {{{AmmoCapacity}}} [[File:KF2_Ammo_Gray.png|baseline|13px|link=]] | |||
|- {{#ifexpr: ({{#if: {{{MagazineSize|}}} | 1 | 0}} or {{#if: {{{AmmoCapacity|}}} | 1 | 0}}) and ({{#if: {{{Damage|}}} | 1 | 0}} or {{#if: {{{FireRate|}}} | 1 | 0}} or {{#if: {{{Accuracy|}}} | 1 | 0}} or {{#if: {{{Penetration|}}} | 1 | 0}}) || style="display: none;"}} | |||
| colspan="4" style="height: 6px;" | | |||
|- {{#if: {{{Damage|}}} | style="height: 20px" | style="display: none;"}} | |- {{#if: {{{Damage|}}} | style="height: 20px" | style="display: none;"}} | ||
| style="padding-left: 12px; width: | | style="padding-left: 12px; width: 136px;" | '''Damage''' | ||
| colspan="2" style="width: 158px;" | <div style="background: #202224 | | colspan="2" style="width: 158px;" | <div style="background: #202224; display: table-cell; height: 12px; margin-top: 4px; width: 100px;"><div style="background: #ffffff; height: 12px; position: relative; top: 0; left: 0; width: {{#expr: (({{#ifeq: {{#expr: {{{Damage}}} / 820 <= 1}} | 1 | {{#expr: {{{Damage}}} / 820}} | 1 }}) ^ 0.5) * 100 }}px"></div></div> | ||
| style="padding-right: 12px; text-align: right;" | {{#expr: {{{Damage}}} round 0}} | | style="padding-right: 12px; text-align: right;" | {{#expr: {{{Damage}}} round 0}} | ||
|- {{#if: {{{FireRate|}}} | style="height: 20px" | style="display: none;"}} | |- {{#if: {{{FireRate|}}} | style="height: 20px" | style="display: none;"}} | ||
| style="padding-left: 12px; width: | | style="padding-left: 12px; width: 136px;" | '''Fire Rate''' | ||
| colspan="2" style="width: 158px;" | <div style="background: #202224 | | colspan="2" style="width: 158px;" | <div style="background: #202224; display: table-cell; height: 12px; margin-top: 4px; width: 100px;"><div style="background: #ffffff; height: 12px; position: relative; top: 0; left: 0; width: {{#expr: ({{#ifeq: {{#expr: {{{FireRate}}} / 800 <= 1}} | 1 | {{#expr: {{{FireRate}}} / 800}} | 1 }}) * 100 }}px"></div></div> | ||
| style="padding-right: 12px; text-align: right;" | {{#expr: {{{FireRate}}} round 0}} | | style="padding-right: 12px; text-align: right;" | {{#expr: {{{FireRate}}} round 0}} | ||
|- {{#if: {{{Accuracy|}}} | style="height: 20px" | style="display: none;"}} | |- {{#if: {{{Accuracy|}}} | style="height: 20px" | style="display: none;"}} | ||
| style="padding-left: 12px; width: | | style="padding-left: 12px; width: 136px;" | '''Accuracy''' | ||
| colspan="2" style="width: 158px;" | <div style="background: #202224 | | colspan="2" style="width: 158px;" | <div style="background: #202224; display: table-cell; height: 12px; margin-top: 4px; width: 100px;"><div style="background: #ffffff; height: 12px; position: relative; top: 0; left: 0; width: {{#expr: (({{#ifeq: {{#expr: {{{Accuracy}}} / 100 <= 1}} | 1 | {{#expr: {{{Accuracy}}} / 100}} | 1 }}) ^ 0.5) * 100 }}px"></div></div> | ||
| style="padding-right: 12px; text-align: right;" | {{#expr: {{{Accuracy}}} round 0}} | | style="padding-right: 12px; text-align: right;" | {{#expr: {{{Accuracy}}} round 0}} | ||
|- {{#if: {{{Penetration|}}} | style="height: 20px" | style="display: none;"}} | |- {{#if: {{{Penetration|}}} | style="height: 20px" | style="display: none;"}} | ||
| style="padding-left: 12px; width: | | style="padding-left: 12px; width: 136px;" | '''Penetration''' | ||
| colspan="2" style="width: 158px;" | <div style="background: #202224 | | colspan="2" style="width: 158px;" | <div style="background: #202224; display: table-cell; height: 12px; margin-top: 4px; width: 100px;"><div style="background: #ffffff; height: 12px; position: relative; top: 0; left: 0; width: {{#expr: ({{#ifeq: {{#expr: {{{Penetration}}} / 4 <= 1}} | 1 | {{#expr: {{{Penetration}}} / 4}} | 1 }}) * 100 }}px"></div></div> | ||
| style="padding-right: 12px; text-align: right;" | {{#expr: {{{Penetration}}} round 1}} | | style="padding-right: 12px; text-align: right;" | {{#expr: {{{Penetration}}} round 1}} | ||
|- {{#ifexpr: ({{#if: {{{Damage|}}} | 1 | 0}} or {{#if: {{{FireRate|}}} | 1 | 0}} or {{#if: {{{Accuracy|}}} | 1 | 0}} or {{#if: {{{Penetration|}}} | 1 | 0}} or {{#if: {{{MagazineSize|}}} | 1 | 0}} or {{#if: {{{AmmoCapacity|}}} | 1 | 0}}) and {{#if: {{{Description|}}} | 1 | 0}} || style="display: none;"}} | |- {{#ifexpr: ({{#if: {{{Damage|}}} | 1 | 0}} or {{#if: {{{FireRate|}}} | 1 | 0}} or {{#if: {{{Accuracy|}}} | 1 | 0}} or {{#if: {{{Penetration|}}} | 1 | 0}} or {{#if: {{{MagazineSize|}}} | 1 | 0}} or {{#if: {{{AmmoCapacity|}}} | 1 | 0}}) and {{#if: {{{Description|}}} | 1 | 0}} || style="display: none;"}} | ||
| colspan="4" style="height: 6px;" | | | colspan="4" style="height: 6px;" | | ||
| Line 49: | Line 51: | ||
|- {{#ifexpr: {{#if: {{{PerkName|}}} | 1 | 0}} or {{#if: {{{Pricing|}}} | 1 | 0}} or {{#if: {{{Weight|}}} | 1 | 0}} || style="display: none;"}} | |- {{#ifexpr: {{#if: {{{PerkName|}}} | 1 | 0}} or {{#if: {{{Pricing|}}} | 1 | 0}} or {{#if: {{{Weight|}}} | 1 | 0}} || style="display: none;"}} | ||
| colspan="4" style="height: 12px;" | | | colspan="4" style="height: 12px;" | | ||
|- {{#ifexpr: {{#if: {{{InitialSpareMags|}}} | 1 | 0}} or {{#if: {{{AmmoCost|}}} | 1 | 0}} or {{#if: {{{Block|}}} | 1 | 0}} or {{#if: {{{Parry|}}} | 1 | 0}} or {{#if: {{{HealAmount|}}} | 1 | 0}} or {{#if: {{{HealAmountSolo|}}} | 1 | 0}} or {{#if: {{{HealRecharge|}}} | 1 | 0}} or {{#if: {{{ | |- {{#ifexpr: {{#if: {{{InitialSpareMags|}}} | 1 | 0}} or {{#if: {{{AmmoCost|}}} | 1 | 0}} or {{#if: {{{Block|}}} | 1 | 0}} or {{#if: {{{Parry|}}} | 1 | 0}} or {{#if: {{{HealAmount|}}} | 1 | 0}} or {{#if: {{{HealAmountSolo|}}} | 1 | 0}} or {{#if: {{{HealRecharge|}}} | 1 | 0}} or {{#if: {{{HealRechargeSelf|}}} | 1 | 0}} or {{#if: {{{WeaponType|}}} | 1 | 0}} or {{#if: {{{SecondaryMagazineSize|}}} | 1 | 0}} or {{#if: {{{SecondaryAmmoCapacity|}}} | 1 | 0}} or {{#if: {{{SecondaryAmmoImage|}}} | 1 | 0}} or {{#if: {{{SecondaryAmmoConsumption|}}} | 1 | 0}} or {{#if: {{{SecondaryAmmoCost|}}} | 1 | 0}} | style="background: #202224; border-top: #bd0000 solid 5px; color: #ffffff; margin-top: 12px; text-align: center;" | style="display: none;"}} | ||
| colspan="4" style="height: 30px;" | '''Weapon Information''' | | colspan="4" style="height: 30px;" | '''Weapon Information''' | ||
|- {{#ifexpr: {{#if: {{{InitialSpareMags|}}} | 1 | 0}} or {{#if: {{{AmmoCost|}}} | 1 | 0}} or {{#if: {{{Block|}}} | 1 | 0}} or {{#if: {{{Parry|}}} | 1 | 0}} or {{#if: {{{HealAmount|}}} | 1 | 0}} or {{#if: {{{HealAmountSolo|}}} | 1 | 0}} or {{#if: {{{HealRecharge|}}} | 1 | 0}} or {{#if: {{{ | |- {{#ifexpr: {{#if: {{{InitialSpareMags|}}} | 1 | 0}} or {{#if: {{{AmmoCost|}}} | 1 | 0}} or {{#if: {{{Block|}}} | 1 | 0}} or {{#if: {{{Parry|}}} | 1 | 0}} or {{#if: {{{HealAmount|}}} | 1 | 0}} or {{#if: {{{HealAmountSolo|}}} | 1 | 0}} or {{#if: {{{HealRecharge|}}} | 1 | 0}} or {{#if: {{{HealRechargeSelf|}}} | 1 | 0}} or {{#if: {{{WeaponType|}}} | 1 | 0}} or {{#if: {{{SecondaryMagazineSize|}}} | 1 | 0}} or {{#if: {{{SecondaryAmmoCapacity|}}} | 1 | 0}} or {{#if: {{{SecondaryAmmoImage|}}} | 1 | 0}} or {{#if: {{{SecondaryAmmoConsumption|}}} | 1 | 0}} or {{#if: {{{SecondaryAmmoCost|}}} | 1 | 0}} || style="display: none;"}} | ||
| colspan="4" style="height: 12px;" | | | colspan="4" style="height: 12px;" | | ||
|- {{#if: {{{InitialSpareMags|}}} | style="height: 20px" | style="display: none;"}} | |- {{#if: {{{InitialSpareMags|}}} | style="height: 20px" | style="display: none;"}} | ||
| Line 68: | Line 70: | ||
| colspan="2" style="padding-left: 12px; vertical-align: top; white-space: nowrap;" | '''Weapon Type''' | | colspan="2" style="padding-left: 12px; vertical-align: top; white-space: nowrap;" | '''Weapon Type''' | ||
| colspan="2" style="padding-right: 12px; text-align: right;" | {{{WeaponType}}} [[File:KF2_WeaponType_{{{WeaponType}}}_Gray.png|top|20px|link=]] | | colspan="2" style="padding-right: 12px; text-align: right;" | {{{WeaponType}}} [[File:KF2_WeaponType_{{{WeaponType}}}_Gray.png|top|20px|link=]] | ||
|- {{#ifexpr: ({{#if: {{{InitialSpareMags|}}} | 1 | 0}} or {{#if: {{{AmmoCost|}}} | 1 | 0}} or {{#if: {{{Block|}}} | 1 | 0}} or {{#if: {{{Parry|}}} | 1 | 0}} or {{#if: {{{WeaponType|}}} | 1 | 0}}) and ({{#if: {{{SecondaryAmmoType|}}} | 1 | 0}} or {{#if: {{{HealAmount|}}} | 1 | 0}} or {{#if: {{{HealAmountSolo|}}} | 1 | 0}} or {{#if: {{{HealAmountGrenade|}}} | 1 | 0}} or {{#if: {{{HealRecharge|}}} | 1 | 0}} or {{#if: {{{ | |- {{#ifexpr: ({{#if: {{{InitialSpareMags|}}} | 1 | 0}} or {{#if: {{{AmmoCost|}}} | 1 | 0}} or {{#if: {{{Block|}}} | 1 | 0}} or {{#if: {{{Parry|}}} | 1 | 0}} or {{#if: {{{WeaponType|}}} | 1 | 0}}) and ({{#if: {{{SecondaryAmmoType|}}} | 1 | 0}} or {{#if: {{{HealAmount|}}} | 1 | 0}} or {{#if: {{{HealAmountSolo|}}} | 1 | 0}} or {{#if: {{{HealAmountGrenade|}}} | 1 | 0}} or {{#if: {{{HealRecharge|}}} | 1 | 0}} or {{#if: {{{HealRechargeSelf|}}} | 1 | 0}} or {{#if: {{{HealDuration|}}} | 1 | 0}} or {{#if: {{{SecondaryMagazineSize|}}} | 1 | 0}} or {{#if: {{{SecondaryAmmoCapacity|}}} | 1 | 0}} or {{#if: {{{SecondaryAmmoConsumption|}}} | 1 | 0}} or {{#if: {{{SecondaryAmmoCost|}}} | 1 | 0}}) || style="display: none;"}} | ||
| colspan="4" style="height: 6px;" | | | colspan="4" style="height: 6px;" | | ||
|- {{#if: {{{SecondaryAmmoType|}}} | style="height: 20px" | style="display: none;"}} | |- {{#if: {{{SecondaryAmmoType|}}} | style="height: 20px" | style="display: none;"}} | ||
| Line 77: | Line 79: | ||
|- {{#if: {{{HealAmount|}}} | style="height: 20px" | style="display: none;"}} | |- {{#if: {{{HealAmount|}}} | style="height: 20px" | style="display: none;"}} | ||
| colspan="2" style="padding-left: 12px; vertical-align: top; white-space: nowrap;" | '''Heal Amount''' {{#if: {{{HealAmountSolo|}}} | <small>(coop)</small> |}} | | colspan="2" style="padding-left: 12px; vertical-align: top; white-space: nowrap;" | '''Heal Amount''' {{#if: {{{HealAmountSolo|}}} | <small>(coop)</small> |}} | ||
| colspan="2" style="padding-right: 12px; text-align: right;" | {{#expr: {{{HealAmount}}} round 0}} | | colspan="2" style="padding-right: 12px; text-align: right;" | {{#expr: {{{HealAmount}}} round 0}} <span style="margin: 0 -1px;">✚</span> | ||
|- {{#if: {{{HealAmountSolo|}}} | style="height: 20px" | style="display: none;"}} | |- {{#if: {{{HealAmountSolo|}}} | style="height: 20px" | style="display: none;"}} | ||
| colspan="2" style="padding-left: 12px; vertical-align: top; white-space: nowrap;" | '''Heal Amount''' <small>(solo)</small> | | colspan="2" style="padding-left: 12px; vertical-align: top; white-space: nowrap;" | '''Heal Amount''' <small>(solo)</small> | ||
| colspan="2" style="padding-right: 12px; text-align: right;" | {{#expr: {{{HealAmountSolo}}} round 0}} | | colspan="2" style="padding-right: 12px; text-align: right;" | {{#expr: {{{HealAmountSolo}}} round 0}} <span style="margin: 0 -1px;">✚</span> | ||
|- {{#if: {{{HealAmountGrenade|}}} | style="height: 20px" | style="display: none;"}} | <!--|- {{#if: {{{HealAmountGrenade|}}} | style="height: 20px" | style="display: none;"}} | ||
| colspan="2" style="padding-left: 12px; vertical-align: top; white-space: nowrap;" | '''Heal Amount''' <small>(per second)</small> | | colspan="2" style="padding-left: 12px; vertical-align: top; white-space: nowrap;" | '''Heal Amount''' <small>(per second)</small> | ||
| colspan="2" style="padding-right: 12px; text-align: right;" | {{#expr: {{{HealAmountGrenade}}} round 0}} | | colspan="2" style="padding-right: 12px; text-align: right;" | {{#expr: {{{HealAmountGrenade}}} round 0}}--> | ||
|- {{#if: {{{HealRecharge|}}} | style="height: 20px" | style="display: none;"}} | |- {{#if: {{{HealRecharge|}}} | style="height: 20px" | style="display: none;"}} | ||
| colspan="2" style="padding-left: 12px; vertical-align: top; white-space: nowrap;" | ''' | | colspan="2" style="padding-left: 12px; vertical-align: top; white-space: nowrap;" | '''Full Recharge Time''' | ||
| colspan="2" style="padding-right: 12px; text-align: right;" | {{#expr: {{{HealRecharge}}} round 1}}s | | colspan="2" style="padding-right: 12px; text-align: right;" | {{#expr: {{{HealRecharge}}} round 1}}s | ||
|- {{#if: {{{ | |- {{#if: {{{HealRechargeSelf|}}} | style="height: 20px" | style="display: none;"}} | ||
| colspan="2" style="padding-left: 12px; vertical-align: top; white-space: nowrap;" | ''' | | colspan="2" style="padding-left: 12px; vertical-align: top; white-space: nowrap;" | '''Full Recharge Time''' <small>(self)</small> | ||
| colspan="2" style="padding-right: 12px; text-align: right;" | {{#expr: {{{ | | colspan="2" style="padding-right: 12px; text-align: right;" | {{#expr: {{{HealRechargeSelf}}} round 1}}s | ||
|- {{#if: {{{HealDuration|}}} | style="height: 20px" | style="display: none;"}} | <!--|- {{#if: {{{HealDuration|}}} | style="height: 20px" | style="display: none;"}} | ||
| colspan="2" style="padding-left: 12px; vertical-align: top; white-space: nowrap;" | '''Heal Duration''' | | colspan="2" style="padding-left: 12px; vertical-align: top; white-space: nowrap;" | '''Heal Duration''' | ||
| colspan="2" style="padding-right: 12px; text-align: right;" | {{#expr: {{{HealDuration}}} round 1}}s | | colspan="2" style="padding-right: 12px; text-align: right;" | {{#expr: {{{HealDuration}}} round 1}}s--> | ||
|- {{#if: {{{SecondaryMagazineSize|}}} | style="height: 20px" | style="display: none;"}} | |- {{#if: {{{SecondaryMagazineSize|}}} | style="height: 20px" | style="display: none;"}} | ||
| colspan="2" style="padding-left: 12px; vertical-align: top; white-space: nowrap;" | '''Magazine Size''' | | colspan="2" style="padding-left: 12px; vertical-align: top; white-space: nowrap;" | '''Magazine Size''' | ||
| Line 108: | Line 110: | ||
| colspan="2" style="padding-left: 12px; vertical-align: top; white-space: nowrap;" | '''Ammo Cost''' | | colspan="2" style="padding-left: 12px; vertical-align: top; white-space: nowrap;" | '''Ammo Cost''' | ||
| colspan="2" style="padding-right: 12px; text-align: right;" | [[File:KF2_Dosh_Gray.png|baseline|10px|link=]] {{{SecondaryAmmoCost}}} | | colspan="2" style="padding-right: 12px; text-align: right;" | [[File:KF2_Dosh_Gray.png|baseline|10px|link=]] {{{SecondaryAmmoCost}}} | ||
|- {{#ifexpr: {{#if: {{{InitialSpareMags|}}} | 1 | 0}} or {{#if: {{{AmmoCost|}}} | 1 | 0}} or {{#if: {{{Block|}}} | 1 | 0}} or {{#if: {{{Parry|}}} | 1 | 0}} or {{#if: {{{HealAmount|}}} | 1 | 0}} or {{#if: {{{HealAmountSolo|}}} | 1 | 0}} or {{#if: {{{HealRecharge|}}} | 1 | 0}} or {{#if: {{{ | |- {{#if: {{{Custom_0_Entry|}}} | style="height: 20px" | style="display: none;"}} | ||
| colspan="2" style="padding-left: 12px; vertical-align: top; white-space: nowrap;" | {{{Custom_0_Entry}}} | |||
| colspan="2" style="padding-right: 12px; text-align: right;" | {{{Custom_0_Value}}} | |||
|- {{#if: {{{Custom_1_Entry|}}} | style="height: 20px" | style="display: none;"}} | |||
| colspan="2" style="padding-left: 12px; vertical-align: top; white-space: nowrap;" | {{{Custom_1_Entry}}} | |||
| colspan="2" style="padding-right: 12px; text-align: right;" | {{{Custom_1_Value}}} | |||
|- {{#if: {{{Custom_2_Entry|}}} | style="height: 20px" | style="display: none;"}} | |||
| colspan="2" style="padding-left: 12px; vertical-align: top; white-space: nowrap;" | {{{Custom_2_Entry}}} | |||
| colspan="2" style="padding-right: 12px; text-align: right;" | {{{Custom_2_Value}}} | |||
|- {{#if: {{{Custom_3_Entry|}}} | style="height: 20px" | style="display: none;"}} | |||
| colspan="2" style="padding-left: 12px; vertical-align: top; white-space: nowrap;" | {{{Custom_3_Entry}}} | |||
| colspan="2" style="padding-right: 12px; text-align: right;" | {{{Custom_3_Value}}} | |||
|- {{#if: {{{Custom_4_Entry|}}} | style="height: 20px" | style="display: none;"}} | |||
| colspan="2" style="padding-left: 12px; vertical-align: top; white-space: nowrap;" | {{{Custom_4_Entry}}} | |||
| colspan="2" style="padding-right: 12px; text-align: right;" | {{{Custom_4_Value}}} | |||
|- {{#if: {{{Custom_5_Entry|}}} | style="height: 20px" | style="display: none;"}} | |||
| colspan="2" style="padding-left: 12px; vertical-align: top; white-space: nowrap;" | {{{Custom_5_Entry}}} | |||
| colspan="2" style="padding-right: 12px; text-align: right;" | {{{Custom_5_Value}}} | |||
|- {{#if: {{{Custom_6_Entry|}}} | style="height: 20px" | style="display: none;"}} | |||
| colspan="2" style="padding-left: 12px; vertical-align: top; white-space: nowrap;" | {{{Custom_6_Entry}}} | |||
| colspan="2" style="padding-right: 12px; text-align: right;" | {{{Custom_6_Value}}} | |||
|- {{#if: {{{Custom_7_Entry|}}} | style="height: 20px" | style="display: none;"}} | |||
| colspan="2" style="padding-left: 12px; vertical-align: top; white-space: nowrap;" | {{{Custom_7_Entry}}} | |||
| colspan="2" style="padding-right: 12px; text-align: right;" | {{{Custom_7_Value}}} | |||
|- {{#if: {{{Custom_8_Entry|}}} | style="height: 20px" | style="display: none;"}} | |||
| colspan="2" style="padding-left: 12px; vertical-align: top; white-space: nowrap;" | {{{Custom_8_Entry}}} | |||
| colspan="2" style="padding-right: 12px; text-align: right;" | {{{Custom_8_Value}}} | |||
|- {{#if: {{{Custom_9_Entry|}}} | style="height: 20px" | style="display: none;"}} | |||
| colspan="2" style="padding-left: 12px; vertical-align: top; white-space: nowrap;" | {{{Custom_9_Entry}}} | |||
| colspan="2" style="padding-right: 12px; text-align: right;" | {{{Custom_9_Value}}} | |||
|- {{#ifexpr: {{#if: {{{InitialSpareMags|}}} | 1 | 0}} or {{#if: {{{AmmoCost|}}} | 1 | 0}} or {{#if: {{{Block|}}} | 1 | 0}} or {{#if: {{{Parry|}}} | 1 | 0}} or {{#if: {{{HealAmount|}}} | 1 | 0}} or {{#if: {{{HealAmountSolo|}}} | 1 | 0}} or {{#if: {{{HealRecharge|}}} | 1 | 0}} or {{#if: {{{HealRechargeSelf|}}} | 1 | 0}} or {{#if: {{{WeaponType|}}} | 1 | 0}} or {{#if: {{{SecondaryMagazineSize|}}} | 1 | 0}} or {{#if: {{{SecondaryAmmoCapacity|}}} | 1 | 0}} or {{#if: {{{SecondaryAmmoImage|}}} | 1 | 0}} or {{#if: {{{SecondaryAmmoConsumption|}}} | 1 | 0}} or {{#if: {{{SecondaryAmmoCost|}}} | 1 | 0}} || style="display: none;"}} | |||
| colspan="4" style="height: 12px;" | | | colspan="4" style="height: 12px;" | | ||
|- {{#ifexpr: {{#if: {{{Achievement_0_Name|}}} | 1 | 0}} or {{#if: {{{Achievement_1_Name|}}} | 1 | 0}} or {{#if: {{{Achievement_2_Name|}}} | 1 | 0}} or {{#if: {{{Achievement_3_Name|}}} | 1 | 0}} or {{#if: {{{Achievement_4_Name|}}} | 1 | 0}} or {{#if: {{{Achievement_5_Name|}}} | 1 | 0}} or {{#if: {{{Achievement_6_Name|}}} | 1 | 0}} or {{#if: {{{Achievement_7_Name|}}} | 1 | 0}} or {{#if: {{{Achievement_8_Name|}}} | 1 | 0}} or {{#if: {{{Achievement_9_Name|}}} | 1 | 0}} | style="background: #202224; border-top: #bd0000 solid 5px; color: #ffffff; margin-top: 12px; text-align: center;" | style="display: none;"}} | |- {{#ifexpr: {{#if: {{{Achievement_0_Name|}}} | 1 | 0}} or {{#if: {{{Achievement_1_Name|}}} | 1 | 0}} or {{#if: {{{Achievement_2_Name|}}} | 1 | 0}} or {{#if: {{{Achievement_3_Name|}}} | 1 | 0}} or {{#if: {{{Achievement_4_Name|}}} | 1 | 0}} or {{#if: {{{Achievement_5_Name|}}} | 1 | 0}} or {{#if: {{{Achievement_6_Name|}}} | 1 | 0}} or {{#if: {{{Achievement_7_Name|}}} | 1 | 0}} or {{#if: {{{Achievement_8_Name|}}} | 1 | 0}} or {{#if: {{{Achievement_9_Name|}}} | 1 | 0}} | style="background: #202224; border-top: #bd0000 solid 5px; color: #ffffff; margin-top: 12px; text-align: center;" | style="display: none;"}} | ||
| Line 136: | Line 168: | ||
|- {{#ifexpr: {{#if: {{{Achievement_0_Name|}}} | 1 | 0}} or {{#if: {{{Achievement_1_Name|}}} | 1 | 0}} or {{#if: {{{Achievement_2_Name|}}} | 1 | 0}} or {{#if: {{{Achievement_3_Name|}}} | 1 | 0}} or {{#if: {{{Achievement_4_Name|}}} | 1 | 0}} or {{#if: {{{Achievement_5_Name|}}} | 1 | 0}} or {{#if: {{{Achievement_6_Name|}}} | 1 | 0}} or {{#if: {{{Achievement_7_Name|}}} | 1 | 0}} or {{#if: {{{Achievement_8_Name|}}} | 1 | 0}} or {{#if: {{{Achievement_9_Name|}}} | 1 | 0}} || style="display: none;"}} | |- {{#ifexpr: {{#if: {{{Achievement_0_Name|}}} | 1 | 0}} or {{#if: {{{Achievement_1_Name|}}} | 1 | 0}} or {{#if: {{{Achievement_2_Name|}}} | 1 | 0}} or {{#if: {{{Achievement_3_Name|}}} | 1 | 0}} or {{#if: {{{Achievement_4_Name|}}} | 1 | 0}} or {{#if: {{{Achievement_5_Name|}}} | 1 | 0}} or {{#if: {{{Achievement_6_Name|}}} | 1 | 0}} or {{#if: {{{Achievement_7_Name|}}} | 1 | 0}} or {{#if: {{{Achievement_8_Name|}}} | 1 | 0}} or {{#if: {{{Achievement_9_Name|}}} | 1 | 0}} || style="display: none;"}} | ||
| colspan="4" style="height: 12px;" | | | colspan="4" style="height: 12px;" | | ||
|- style="background: #ffffff; color: #ffffff; text-align: center;" | |||
| colspan="4" style="height: 12px; padding: 0;" | <div style="background: #ffffff; height: 12px; position: relative; top: -12px; width: 350px;"><div style="background: linear-gradient(45deg, #ffffff 4px, #000000 0, #000000 60%, transparent 60%) bottom left, linear-gradient(315deg, #ffffff 4px, #000000 0, #000000 60%, transparent 60%) bottom right; height: 6px; position: relative; top: 0px; width: 350px;"></div></div> | |||
|}</includeonly> | |}</includeonly> | ||
<noinclude> | <noinclude> | ||
| Line 165: | Line 199: | ||
| HealAmount=0 | | HealAmount=0 | ||
| HealAmountSolo=0 | | HealAmountSolo=0 | ||
| HealRecharge=0 | | HealRecharge=0 | ||
| | | HealRechargeSelf=0 | ||
| SecondaryMagazineSize=0 | | SecondaryMagazineSize=0 | ||
| SecondaryAmmoCapacity=100 | | SecondaryAmmoCapacity=100 | ||
| SecondaryAmmoConsumption=0 | | SecondaryAmmoConsumption=0 | ||
| SecondaryAmmoCost=0 | | SecondaryAmmoCost=0 | ||
| | |||
| Custom_0_Entry='''Heal Amount''' <small>(per second)</small> | |||
| Custom_0_Value=5 <span style="margin: 0 -1px;">✚</span> | |||
| Custom_1_Entry='''Heal Duration''' | |||
| Custom_1_Value=8s | |||
| Custom_2_Entry= | |||
| Custom_2_Value= | |||
| Custom_3_Entry= | |||
| Custom_3_Value= | |||
| Custom_4_Entry= | |||
| Custom_4_Value= | |||
| Custom_5_Entry= | |||
| Custom_5_Value= | |||
| Custom_6_Entry= | |||
| Custom_6_Value= | |||
| Custom_7_Entry= | |||
| Custom_7_Value= | |||
| Custom_8_Entry= | |||
| Custom_8_Value= | |||
| Custom_9_Entry= | |||
| Custom_9_Value= | |||
| | | | ||
| Achievement_0_Image=KF2_Achievement_109.jpg | | Achievement_0_Image=KF2_Achievement_109.jpg | ||
| Line 469: | Line 522: | ||
---- | ---- | ||
|- | |- | ||
| style="font-family: monospace, Courier; vertical-align: top; white-space: nowrap;" | <nowiki>| | | style="font-family: monospace, Courier; vertical-align: top; white-space: nowrap;" | <nowiki>| HealRechargeSelf=</nowiki> | ||
| style="vertical-align: top;" |   | | style="vertical-align: top;" |   | ||
| style="vertical-align: top; width: 300px;" | How long it takes until the Syringe is fully charged after healing yourself <small>(Syringe only)</small> | | style="vertical-align: top; width: 300px;" | How long it takes until the Syringe is fully charged after healing yourself <small>(Syringe only)</small> | ||
| Line 525: | Line 578: | ||
| style="vertical-align: top;" | ''Example: '' | | style="vertical-align: top;" | ''Example: '' | ||
| style="vertical-align: top;" | ''0'' | | style="vertical-align: top;" | ''0'' | ||
|- | |||
| colspan="6" | | |||
---- | |||
|- | |||
| colspan="6" style="font-family: monospace, Courier; vertical-align: top; white-space: nowrap;" | <nowiki>|</nowiki> | |||
|- | |||
| colspan="6" | | |||
---- | |||
|- | |||
| style="font-family: monospace, Courier; vertical-align: top; white-space: nowrap;" | <nowiki>| Custom_0_Entry=</nowiki> | |||
| style="vertical-align: top;" |   | |||
| style="vertical-align: top; width: 300px;" | Additional custom entries | |||
| style="vertical-align: top;" |   | |||
| style="vertical-align: top;" | ''Example: '' | |||
| style="vertical-align: top;" | ''<nowiki>'''Heal Amount''' <small>(per second)</small></nowiki>'' | |||
|- | |||
| colspan="6" | | |||
---- | |||
|- | |||
| style="font-family: monospace, Courier; vertical-align: top; white-space: nowrap;" | <nowiki>| Custom_0_Value=</nowiki> | |||
| style="vertical-align: top;" |   | |||
| style="vertical-align: top; width: 300px;" | Additional custom values | |||
| style="vertical-align: top;" |   | |||
| style="vertical-align: top;" | ''Example: '' | |||
| style="vertical-align: top;" | ''<nowiki>5 <span style="margin: 0 -1px;">&#10010;</span></nowiki>'' | |||
|- | |||
| colspan="6" | | |||
---- | |||
|- | |||
| colspan="6" style="font-family: monospace, Courier; vertical-align: top; white-space: nowrap;" | <nowiki>| Custom_1_Entry=</nowiki> | |||
|- | |||
| colspan="6" | | |||
---- | |||
|- | |||
| colspan="6" style="font-family: monospace, Courier; vertical-align: top; white-space: nowrap;" | <nowiki>| Custom_1_Value=</nowiki> | |||
|- | |||
| colspan="6" | | |||
---- | |||
|- | |||
| style="font-family: monospace, Courier; vertical-align: top; white-space: nowrap;" | <nowiki>| </nowiki>'''.'''<br /><nowiki>| </nowiki>'''.'''<br /><nowiki>| </nowiki>'''.''' | |||
| style="font-family: monospace, Courier; text-align: center; vertical-align: top;" |   | |||
| style="font-family: monospace, Courier; text-align: center; vertical-align: top; width: 300px;" | '''.'''<br />'''.'''<br />'''.''' | |||
| style="font-family: monospace, Courier; text-align: center; vertical-align: top;" |   | |||
| colspan="2" style="font-family: monospace, Courier; text-align: center; vertical-align: top;" | '''.'''<br />'''.'''<br />'''.''' | |||
|- | |||
| colspan="6" | | |||
---- | |||
|- | |||
| colspan="6" style="font-family: monospace, Courier; vertical-align: top; white-space: nowrap;" | <nowiki>| Custom_2_Entry=</nowiki> | |||
|- | |||
| colspan="6" | | |||
---- | |||
|- | |||
| colspan="6" style="font-family: monospace, Courier; vertical-align: top; white-space: nowrap;" | <nowiki>| Custom_2_Value=</nowiki> | |||
|- | |- | ||
| colspan="6" | | | colspan="6" | | ||
| Line 654: | Line 761: | ||
| HealAmountGrenade= | | HealAmountGrenade= | ||
| HealRecharge= | | HealRecharge= | ||
| | | HealRechargeSelf= | ||
| HealDuration= | | HealDuration= | ||
| SecondaryMagazineSize= | | SecondaryMagazineSize= | ||
| Line 660: | Line 767: | ||
| SecondaryAmmoConsumption= | | SecondaryAmmoConsumption= | ||
| SecondaryAmmoCost= | | SecondaryAmmoCost= | ||
| | |||
| Custom_0_Entry= | |||
| Custom_0_Value= | |||
| Custom_1_Entry= | |||
| Custom_1_Value= | |||
| Custom_2_Entry= | |||
| Custom_2_Value= | |||
| Custom_3_Entry= | |||
| Custom_3_Value= | |||
| Custom_4_Entry= | |||
| Custom_4_Value= | |||
| Custom_5_Entry= | |||
| Custom_5_Value= | |||
| Custom_6_Entry= | |||
| Custom_6_Value= | |||
| Custom_7_Entry= | |||
| Custom_7_Value= | |||
| Custom_8_Entry= | |||
| Custom_8_Value= | |||
| Custom_9_Entry= | |||
| Custom_9_Value= | |||
| | | | ||
| Achievement_0_Image= | | Achievement_0_Image= | ||
Revision as of 02:06, 11 August 2016
| Killing Floor 2 item | |||
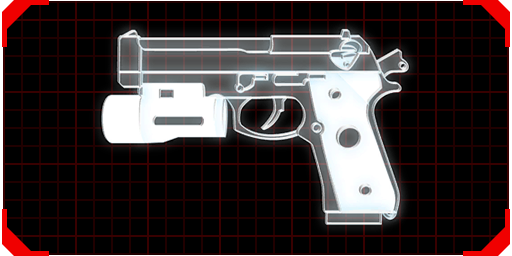
9mm Pistol | |||

| |||
| Magazine Size | 15 | ||
| Ammo Capacity | 225 | ||
| Damage | 15 | ||
| Fire Rate | 343 | ||
| Accuracy | 50 | ||
| Penetration | 0 | ||
| • Fire mode is semi-auto only. • This is the standard 9mm pistol. Simple and cheap (very cheap, frankly, to you), it is the basic sidearm for all Horzine operatives. | |||
| General Information | |||
| Perk | All | ||
| Pricing | |||
| Weight | |||
| Weapon Information | |||
| Starting Ammo | 15 + 105 | ||
| Ammo Cost | |||
| Block (damage multiplier) | ×1 | ||
| Parry (damage multiplier) | ×1 | ||
| Weapon Type | Pistol | ||
| Secondary Ammo | |||
| Ammo Type | Healing Darts | ||
| Heal Amount (coop) | 0 ✚ | ||
| Heal Amount (solo) | 0 ✚ | ||
| Full Recharge Time | 0s | ||
| Full Recharge Time (self) | 0s | ||
| Magazine Size | 0 | ||
| Ammo Capacity | 100 | ||
| Starting Ammo | 100 | ||
| Ammo Consumption (per use) | 0 | ||
| Ammo Cost | |||
| Heal Amount (per second) | 5 ✚ | ||
| Heal Duration | 8s | ||
| Related Achievements | |||
Syntax
Parameters
| {{KF2WeaponInfo | |||||
|
| |||||
| | Name= | Name of the weapon | Example: | 9mm Pistol | ||
|
| |||||
| | PerkImage= | Name of the image of the corresponding perk | Example: | KF2_No_Perk_White.png | ||
|
| |||||
| | PerkLink= | Name of the page of the corresponding perk | Example: | Perks (Killing Floor 2) | ||
|
| |||||
| | WeaponImage= | Name of the image of the corresponding weapon | Example: | KF29mm Pistol.png | ||
|
| |||||
| | Damage= | Damage value of the weapon | Example: | 15.000000 | ||
|
| |||||
| | FireRate= | Fire Rate value of the weapon | Example: | 342.857147 | ||
|
| |||||
| | Accuracy= | Accuracy value of the weapon | Example: | 50.000000 | ||
|
| |||||
| | Penetration= | Penetration value of the weapon | Example: | 0.000000 | ||
|
| |||||
| | MagazineSize= | Magazine capacity | Example: | 15 | ||
|
| |||||
| | AmmoCapacity= | Maximum spare ammo | Example: | 225 | ||
|
| |||||
| | Description= | Trader descripton of the weapon | Example: | • Fire mode is semi-auto only. • This is the standard 9mm pistol. Simple and cheap (very cheap, frankly, to you), it is the basic sidearm for all Horzine operatives. | ||
|
| |||||
| | | |||||
|
| |||||
| | PerkName= | Name of the corresponding perk | Example: | All | ||
|
| |||||
| | Pricing= | How much the weapon costs at the trader | Example: | 0 | ||
|
| |||||
| | Weight= | How much the weapon weights | Example: | 0 | ||
|
| |||||
| | | |||||
|
| |||||
| | InitialSpareMags= | How much spare magazines you have Displays "Starting Ammo" |
Example: | 7 | ||
|
| |||||
| | AmmoCost= | How much one magazine costs | Example: | 8 | ||
|
| |||||
| | Block= | Damage multiplier while blocking | Example: | 1 | ||
|
| |||||
| | Parry= | Damage multiplier while parrying | Example: | 1 | ||
|
| |||||
| | WeaponType= | The weapons weapon type | Example: | Pistol | ||
|
| |||||
| | | |||||
|
| |||||
| | SecondaryAmmoType= | Ammo Type of the secondary Ammunition | Example: | Healing Dart | ||
|
| |||||
| | SecondaryAmmoImage= | Name of the Image of the corresponding Ammo Type | Example: | KF2_SecondaryAmmo_MedicDarts_Gray.png | ||
|
| |||||
| | HealAmount= | How much the Healing Dart heals other players | Example: | 0 | ||
|
| |||||
| | HealAmountSolo= | How much you heal yourself (Syringe only) | Example: | 0 | ||
|
| |||||
| | HealAmountGrenade= | How much you heal per second (Grenade only) | Example: | 0 | ||
|
| |||||
| | HealRecharge= | How long it takes until the Healing Dart / Syringe is fully charged after healing other players | Example: | 0 | ||
|
| |||||
| | HealRechargeSelf= | How long it takes until the Syringe is fully charged after healing yourself (Syringe only) | Example: | 0 | ||
|
| |||||
| | HealDuration= | How long the Medic Grenade lasts (Grenade only) | Example: | 0 | ||
|
| |||||
| | SecondaryMagazineSize= | Magazine Size of the secondary Ammo Type | Example: | 0 | ||
|
| |||||
| | SecondaryAmmoCapacity= | Maximum spare ammo of the secondary Ammo Type | Example: | 100 | ||
|
| |||||
| | SecondaryAmmoConsumption= | How much ammo it takes to use one shot / attack with the weapon | Example: | 0 | ||
|
| |||||
| | SecondaryAmmoCost= | How much one magazine costs of the secondary Ammo Type | Example: | 0 | ||
|
| |||||
| | | |||||
|
| |||||
| | Custom_0_Entry= | Additional custom entries | Example: | '''Heal Amount''' <small>(per second)</small> | ||
|
| |||||
| | Custom_0_Value= | Additional custom values | Example: | 5 <span style="margin: 0 -1px;">✚</span> | ||
|
| |||||
| | Custom_1_Entry= | |||||
|
| |||||
| | Custom_1_Value= | |||||
|
| |||||
| | . | . | . |
. . . |
. . . | |||
|
| |||||
| | Custom_2_Entry= | |||||
|
| |||||
| | Custom_2_Value= | |||||
|
| |||||
| | | |||||
|
| |||||
| | Achievement_0_Image= | Name of the image of the corresponding achievement | Example: | KF2_Achievement_109.jpg | ||
|
| |||||
| | Achievement_0_Name= | Name of the achievement the weapon is related to | Example: | School's Out Forever | ||
|
| |||||
| | Achievement_1_Image= | |||||
|
| |||||
| | Achievement_1_Name= | |||||
|
| |||||
| | . | . | . |
. . . |
. . . | |||
|
| |||||
| | Achievement_9_Image= | |||||
|
| |||||
| | Achievement_9_Name= | |||||
|
| |||||
| }} | |||||
Weapon Types
There are 10 specific choices for this section.
| Weapon Type | Corresponding Image |
|---|---|
| Pistol | |
| Shotgun | |
| Rifle | |
| Projectile | |
| Flame Weapon | |
| Electric Weapon | |
| Explosive | |
| Assault Rifle | |
| Melee Weapon | |
| SMG |
Template
Copy this template for quick usage.
{{KF2WeaponInfo
| Name=
| PerkImage=
| PerkLink=
| WeaponImage=
| Damage=
| FireRate=
| Accuracy=
| Penetration=
| MagazineSize=
| AmmoCapacity=
| Description=
|
| PerkName=
| Pricing=
| Weight=
|
| InitialSpareMags=
| AmmoCost=
| Block=
| Parry=
| WeaponType=
|
| SecondaryAmmoType=
| SecondaryAmmoImage=
| HealAmount=
| HealAmountSolo=
| HealAmountGrenade=
| HealRecharge=
| HealRechargeSelf=
| HealDuration=
| SecondaryMagazineSize=
| SecondaryAmmoCapacity=
| SecondaryAmmoConsumption=
| SecondaryAmmoCost=
|
| Custom_0_Entry=
| Custom_0_Value=
| Custom_1_Entry=
| Custom_1_Value=
| Custom_2_Entry=
| Custom_2_Value=
| Custom_3_Entry=
| Custom_3_Value=
| Custom_4_Entry=
| Custom_4_Value=
| Custom_5_Entry=
| Custom_5_Value=
| Custom_6_Entry=
| Custom_6_Value=
| Custom_7_Entry=
| Custom_7_Value=
| Custom_8_Entry=
| Custom_8_Value=
| Custom_9_Entry=
| Custom_9_Value=
|
| Achievement_0_Image=
| Achievement_0_Name=
| Achievement_1_Image=
| Achievement_1_Name=
| Achievement_2_Image=
| Achievement_2_Name=
| Achievement_3_Image=
| Achievement_3_Name=
| Achievement_4_Image=
| Achievement_4_Name=
| Achievement_5_Image=
| Achievement_5_Name=
| Achievement_6_Image=
| Achievement_6_Name=
| Achievement_7_Image=
| Achievement_7_Name=
| Achievement_8_Image=
| Achievement_8_Name=
| Achievement_9_Image=
| Achievement_9_Name=
}}