Red Orchestra 2: Heroes Of Stalingrad/LevelDesign/RO2DestructionSystem
Red Orchestra 2 Destructible Setup Guide
Red Orchestra 2 has a number of tools to facilitate destructible environments and/or objectives. This document is to serve as a means to understand how to set up the systems and why you would want to use each of the tools available.
The topics covered in this document will be:
- ROStaticMeshDestructible
- ROStaticMeshReplicationInfo
- ROObjectiveSatchel
- ROStaticMeshObstacle
- ROStaticMeshSatchelObstacle
- RODestructible
ROStaticMeshDestructible
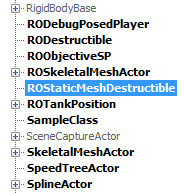
Setup of ROStaticMeshDestuctible map actors
1) Select the base static mesh that will appear to the players in it's “undestroyed” state
2) Select the map actor in the actor tree
3) RMB → Add ROStaticMeshDestructible Here
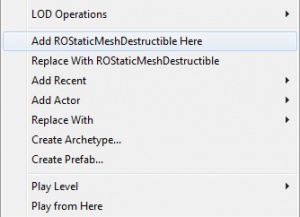
4) Open the properties of the newly place actor and find the StaticMeshComponent section of ROStaticMeshDestructible (Properties → ROStaticMeshDestructible → Destructible Mesh Component → StaticMeshComponent → Static Mesh) and replace the default static with the one selected in step 1. This is what is shown to the level designer in the editor.
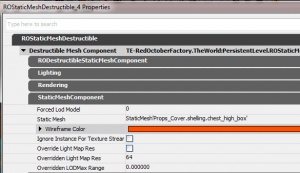
5) Open the RODestructibleStaticMeshComponent section of the properties
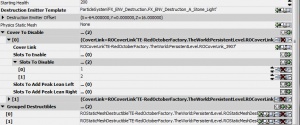
6) Add at least two entries to the Destructible Assets list
7) In the 0 section put the same base mesh as that of the Static Mesh. This is what will be shown to the players at runtime. NOTE: Use the Material Override to override the material that will be rendered in game. The LODMaterial Override should be used to override the materials on the LODs of the StaticMesh, if it exists, that will be rendered in game.
8) In the 1 section put the destructed stage of the base static mesh. NOTE: You can add more than two stages but for each stage the lighting system will have to make a shadow map which can cause some bloat in map size.
9) Under the Accepted Damage Types add the damage types you'd like to have effect the ROStaticMeshDestructible

10) Set the appropriate value for Starting Health. If you'd like a tank to be able to run over the actor, give it a starting health of 1
11) Set an appropriate emitter for the Destruction Emitter Template. This is what will be shown to the players when it changes states. The emitter will be spawned at the origin of the Static Mesh itself.
12) Use the Destruction Emitter Offset values to adjust the spawn origin of the static mesh the origin of the Static Mesh being used is not in a good place for spawning an emitter
13) If you would like the destructible to become active and interact with world space on destruction, set the Physics Static Mesh. NOTE: If you are going to have an active physics actors spawn instead of a destruction phase static mesh, leave the section in Step 8 empty.
14) If there is cover that you would like to activate/deactivate upon stage change, you can add the cover references here. NOTE: ROStaticMeshDestructible and cover node must be in the same level. Usually the persistent. Use the Lock properties to allow selecting the cover node in the map without change the property window
15) If you'd like to have multiple destructible static meshes to destroy even if they are not directly touched by the damage, add references to the ROStaticMeshDestructible to the Grouped Destructibles section of the properties.

RODestructionReplicationInfo
The purpose of this actor is to provide a lighter weight replication solution for destructible actors in a map; instead of sending a lot of information from the server to the client to change the state of a destructible actor in a map this actor sends just the Integer value of the destructible in info structure. This makes it a little bit more intensive for the server when a large number of destructible map actors change state simultaneously but should not bog down the net code.
Rules of Thumb
1) No more than 300 destructible actors in each RODestructibleReplicationInfo actor
2) Maps are not suggested to exceed 500 destructible actors
3) No limitation of the number of RODestructibleReplicationInfo
4) The RODestructibleReplicationInfo actor must be in the same level as the ROStaticMeshDestructible, usually the Persistent level.
Setting Up RODestructibleReplicationInfo Actors
1) Find and place a RODestructibleReplicationInfo Actor in your map
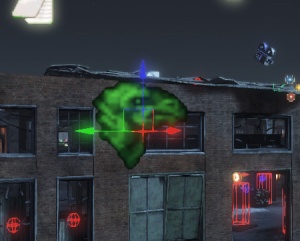
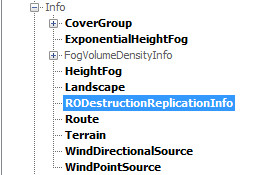
2) Open the properties of the RODestructibleReplicationInfo actor and lock the properties
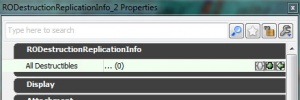
3) Open the Scene manager
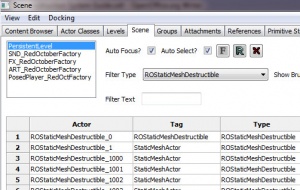
4) Select the persistent level
5) Use the pulldown to select ROStaticMeshDestructible in the filter
6) Add the appropriate number of slots to the replication actor (not exceeding 300)
7) Select the first ROStaticMeshDestructible
8) Add it to the first entry in the RODestructibleReplicationInfo actor
9) Repeat steps 7-9 until you've either added all the ROStaticMeshDestructible actors in the map to the RODestructibleReplicationInfo actor or you've added 300 to the actor
Objective Based Destructible
This section covers how to setup objective based destructible solutions.
ROObjectiveSatchel
The purpose of the ROObjectiveSatchel is to allow for the capability for level designers to have objectives that “capture” upon destruction. It also allows for “proximity” capturing via a ROPlaceableVolume and otherwise functions 100% like a standard ROObjective.
Setup of ROObjectiveSatchel
1) Open the content browser and select a static mesh that you'd like to use for a ROObjectiveSatchel. Ideally this mesh will have it's origin centered on the object correctly (center, bottom-center, corner, etc).
2) Find the ROObjectiveSatchel in the actor tree and place one in your map where you'd like the satchel objective to be
3) Open the properties of the ROObjectiveSatchel and Expand the StaticMeshComponent section and replace the Static Mesh field with the mesh selected in Step 1

4) Add at least two entries to the Destructible Assets list
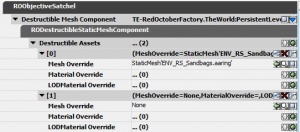
5) In the 0 section put the same base mesh as that of the Static Mesh. This is what will be shown to the players at runtime. NOTE: Use the Material Override to override the material that will be rendered in game. The LODMaterial Override should be used to override the materials on the LODs of the StaticMesh, if it exists, that will be rendered in game.
6) In the 1 section put the destructed stage of the base static mesh. NOTE: You can add more than two stages but for each stage the lighting system will have to make a shadow map which can cause some bloat in map size.
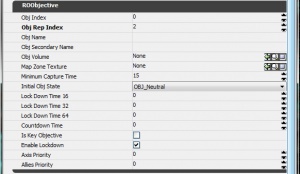
7) Expand the ROObjective section and fill that out:
Obj Index – this is a unique value that assigns the alphabetical assignment to the objective
Obj Rep Index – this is a unique value that is used in replication. Usually this has the same value as the object name. For example, if the objective name is ROObjective_1 the Obj Rep Index will be 1
Obj Name – this is localize name of the objective
Obj Secondary Name – this is a internally used field that will be rendered on the overhead map. Any value here will be ignored in game. Best to leave it blank
Obj Volume – this is the ROPlaceableVolume that is assigned to this objective for “proximity” capturing
Map Zone Texture – this is a texture that is used as an overlay for the overhead map when the objective becomes active
Minimum Capture Time – this time, in seconds, is the the amount of time it will take to capture the objective
Initial Obj State – use the pulldown to select the initial defender state of the objective. NOTE: Neutral objective assignment for a ROObjectiveSatchel is not supported
Lock Down Time 16/32/64 – these fields are deprecated and values assigned will not do anything
Countdown Time – this is the amount of time the objective is active in the Countdown game mode, counted in seconds
Is Key Objective – this bit is used in Countdown and gives an additional reinforcement for the commander
Enable Lockdown – this bit is used to enable the procedural lockdown system in RO2
Axis/Allies Priority – this is the order in which the AI will attack or defend the objectives.
RODamageOtherVolume
There is an additional supporting actor called a RODamageOtherVolume that allows of dropping the Satchel weapon (equipment for the engineering role) inside the volume. This overcomes the limitation that occurs when the origin of the SatchelObjective mesh is in a location to be “touched” by the explosion radius. For example, if the physical objective is inside a brick building but you'd like for the ability for the players to drop the satchel near the building and still destroy the objective.
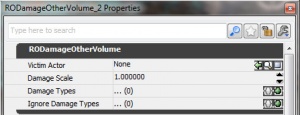
Victim Actor: This points to the ROObjectiveSatchel that you'd like have accept the damage
Damage Scale: A scale value of the damage applied to the Victim Actor
Damage Types: The accepted damage types
Ignore Damage Types: The damage types that should be ignored (usually to filter out subclasses of a damage type that won't damage the objective but the parent class will)
ROStaticMeshObstacle
These map actors are used to block off sections of NavMesh/Gamespace so that AI and players do not access certain areas of the map. Ideal use is when differentiating player loads between 16/32/64p matches
Setup of ROStaticMeshObstacle
1) Select a static mesh from the content browser
2) Select ROStaticMeshObstacle from the Actor tree (Actor -> NavMeshObstacle -> ROStaticMeshObstacle)
3) RMB -> Place ROStaticMeshObstacle here
This should give you the static mesh you selected in Step 1 as a ROStaticMeshObstacle
4) Select the newly create ROStaticMeshObstacle in the map
5) Open Kismet and attach the ROStaticMeshObstacle to a Toggle action. Toggle ON to have it active Toggle OFF to have inactive
What toggling does:
A) Turns on/off navmesh beneath it's bounding box
B) Turn on/off collision of the StaticMesh actor
ROStaticMeshSatchelObstacle
RODestructible
This actor has been antiquated and removed from the Actor tree