Capture The Flag (RO2 MOD): Difference between revisions
(→Actors/Volumes: Modified the description of a picture.) |
(→Cooking: Removed map extension.) |
||
| Line 113: | Line 113: | ||
set SteamDir=<span style="background:#00FF00">C:\Program Files (x86)\Steam</span> | set SteamDir=<span style="background:#00FF00">C:\Program Files (x86)\Steam</span> | ||
set MapName=<span style="background:#00FF00">CTF-Prototype</span> | set MapName=<span style="background:#00FF00">CTF-Prototype</span> | ||
"%SteamDir%\SteamApps\common\red orchestra 2\Binaries\Win64\ROGame.exe" CookPackages %MapName% | "%SteamDir%\SteamApps\common\red orchestra 2\Binaries\Win64\ROGame.exe" CookPackages %MapName% -platform=PC -MapsOnly -UpdateInisAuto | ||
"%SteamDir%\SteamApps\common\red orchestra 2\Binaries\Win64\ROGame.exe" CookPackages %MapName% | "%SteamDir%\SteamApps\common\red orchestra 2\Binaries\Win64\ROGame.exe" CookPackages %MapName% -platform=PCServer -MapsOnly -UpdateInisAuto | ||
==== Packaging ==== | ==== Packaging ==== | ||
Revision as of 02:14, 17 December 2012

Capture The Flag for Red Orchestra 2 is a MOD developed by -=THOR=-, with the collaboration of Mad_Fred and GrimReality. It introduces the classic CTF game type to RO2. Each team has a flag, generally located close to its initial spawn area. The objective is to take flag of the enemy, and bring it home to 'capture' it. A soldier can capture the enemy flag when his own flag is home. When the flag carier dies, the flag drops on the ground. If an enemy touches its flag, or after a server-customizable delay expires, the flag returns automatically to its stand. Before it that happens, a teammate of the dead flag carrier can pick it up and continue.
Features
- Realistic flag, made of a static mesh for the pole, and skeletal mesh for the fabric. The skeletal mesh uses UDK cloth physics. The flag is attached to the back of the player when carried (like a shouldered rifle).
- Spawn protected or other mapper-specified zones cannot be entered by flag carriers (else, the flag returns automatically after a delay expires).
- A HUD widget at the bottom of the screen appears when a flag is not home, and indicates the status of the flags (home, taken or dropped). It is always visible in the tactical overlay. The icons change dynamically.
- The location of the flag bays are indicated by moving icons on the tactical overlay. The icons change dynamically depending on the state of the flag.
- Custom alerts are displayed in the middle of the screen, when a flag is taken, dropped, returned, expired or captured. The player name of the instigator is displayed on a second row, in smaller characters (when applicable).
- The number of flags capped on each team is displayed to the left of the scoreboard, on the map, and in the tactical overlay.
- Improved pathing system for AI, allowing mappers to define tactical routes.
- Spawn locations can change dynamically as the teams move on the map and get control over areas. The user anually selects his spawn location.
- Optional configurable anti-camping system. The system discourages carriers from camping in a dark corner, helping to resolve the situation where both flag carriers hide somewhere. After some time with both flags taken, a flag carrier who is not moving enough will be displayed on the HUD of the enemy, for a few seconds, every few minutes (all delays are configurable).
- Humans can steal the flag from a friendly bot that is carrying it.
- Arty can be used with a delay between strikes instead of a number of strikes per round.
- 'Hot Zones' can be defined throughout the map, and have a team index. Those are used to define areas around the flag bays, into which players get bonus points for attacking/defending.
- Bots have a CTF-specific AI logic. It will try to take/capture/return flags (as long as the mapper implements pathing correctly on his map).
- Sounds are played for taking, returning and capping a flag, as well as the flag expiration.
- Custom messages are displayed accordingly to the CTF points system.
- The flag bays appear on the map with a dynamic icon, and instructions in the right panel change with states of the flags.
- Dead Roaming and 1st/3rd persons spectating are disabled for dead players. These view modes are only available for spectators, or when the mapper forgets to define cameras. A camera can be team-specific, or shared.
- The flag carrier will be displayed with a special icon on the map.
- Morale is affected by the number of captures of each team.
- Spawn on squad leader an commander force-respawn are supported.
- In the scoreboard, the player name of the flag carrier is displayed with a lighter color, and a "(FC)" tag next to their name.
- The classic compass is always used (independently from the game mode).
- The round/match end screens have been customized with custom stats (flags capped last round, and total flags capped).
- A round can be won by capping enough flags, or at the end of the time limit, by having more flags than the opponent.
- A match can be won by winning more rounds, or capping more flags (total of the match) than the enemy.
- Tied rounds are taken into consideration for the maximum number of rounds allowed.
- When there are 60 seconds left, a timer appears at the top of the screen and turns red when 30 seconds are left. It is similar to Firefight.
- A customizable 'credits' panel appears at the bottom-left of the 'Round Start' window. The mapper enters the information in the SDK (WorldInfo).
- The scoreboard shows the name of the custom gametype at the top.
- The round start screen is customized to display the CTF information.
Points System
- Taking the enemy flag (flag bay): +5 team points.
- Taking the enemy flag (dropped): +3 team points.
- Killing an enemy who is near your flag bay: +2 team points.
- Killing an enemy who is near the enemy flag bay: +3 team points.
- Returning (touching) your flag after it has been dropped: +5 team points.
- Flag carrier defending himself: +2 team points.
- Killing the enemy flag carrier: +3 team points.
- When a flag capture happens:
- 10 points are awarded to the final flag carrier.
- 15 points are split between the final and intermediate flag carriers (min 5 points/carrier).
- 3 points are awarded to players of the capping team that got at least 1 kill while the flag was being carried.
- The maximum number of cap points is clamped at 25 points per capture.
Server
Installation
Mappers should provide a package containing the CTF server and client files with the map. Just extract those at the proper locations. Maps built with different CTF versions will be incompatible.
Configuration File
Many parameters can be edited in the WebAdmin under GameTypes/Capture The Flag. These parameters are directly linked to variables with a similar name in the configuration file ROCustomGameTypes.ini. These parameters will be explained here. Beware that changing the value of any other parameter may cause unexpected behavior.
[CustomGameTypes.CGTGameInfoCTF]
- MinPlayers: It is not recommended to play CTF above 24 players (not for performance reasons, but to ensure enjoyable gameplay). As a result, MinPlayers should be kept in the range 0-24.
- TimeLimit: (recommended range: 1200-2400)
- RoundLimit: We suggest playing only 1 round per match. That way, only the number of flags captured determine the issue of the match. (recommended value: 1)
- RoundTeamScoreLimit: It defines the limit of the team score (flag captures) per round. We suggest a limit of 6-12 captures for 1200-2400 seconds per round. The number of flags captured varies with the number of players.
- MinimumTimeDead: It defines the minimum time during which a player will remain dead. If a reinforcement wave occurs before this delay is expired, the player will spawn on the next spawn wave. (recommended value is 7)
- ReinforcementDelay: It defines the delay between reinforcement waves. Keep in mind that dynamic spawn zones are processed after each reinforcement wave. (recommended value is 7)
- FlagExpirationDelay: It defines how long a flag can remain on the ground when dropped. (recommended range is 15-30).
- ForceUnlimitedRoles: If set to true, classes will not be limited (like in Firefight). We recommend leaving this setting to false.
- ForceCompleteAllRounds: If set to true, all rounds will be played. (recommended value is false).
- OvertimeDuration: This parameter defines the maximum duration of the overtime. (recommended value is 180).
- CarrierCampingGraceDelay: This setting controls the delay between a flag being taken and the Anti-Camping system activating. (recommended value: 30)
- CarrierCampingRevelationInterval: This setting defines the interval at which the flag carrier anti-camping system is activated. (recommended value: 30)
- CarrierCampingRevelationDuration: It defines for how long the flag carrier is revealed when the anti-camping system reveals him. (recommended value: 3)
- CarrierCampingDistance: It defines the distance in meters that the flag carrier must walk to prevent the anti-camping system from being activated. (recommended value: 10)
URL Parameters
- ?game=CustomGameTypes.CGTGameInfoCTF: When a CTF map is used in the startup command line, the URL must include this parameter. It is also required in a URL defined in the DynamicMapRotator mutator. Map changes through the WebAdmin do not require this parameter.
- ?RoundTeamScoreLimit=<value>: Overrides RoundTeamScoreLimit defined in the configuration file.
- ?ForceCompleteAllRounds=<value>: Overrides ForceCompleteAllRounds defined in the configuration file.
- ?MinimumTimeDead=<value>: Overrides ForceUnlimitedRoles defined in the configuration file.
- ?OvertimeDuration=<value>: Overrides OvertimeDuration defined in the configuration file.
- ?ReinforcementDelay=<value>: Overrides ReinforcementDelay defined in the configuration file.
- ?FlagExpirationDelay=<value>: Overrides FlagExpirationDelay defined in the configuration file.
- ?CarrierCampingGraceDelay=<value>: Overrides CarrierCampingGraceDelay defined in the configuration file.
- ?CarrierCampingRevelationInterval=<value>: Overrides CarrierCampingRevelationInterval defined in the configuration file.
- ?CarrierCampingRevelationDuration=<value>: Overrides CarrierCampingRevelationDuration defined in the configuration file.
- ?CarrierCampingDistance=<value>: Overrides CarrierCampingDistance defined in the configuration file.
Processes for Modders
Install
- Extract the CustomGameTypes_Modder_x_y_z archive to Documents\My Games\RedOrchestra2. When prompted to merge folders, click YES. Make sure you don't extract the ROGame folder inside ROGame.
- In Documents\My Games\RedOrchestra2\ROGame\Config\ROEditor.ini, under [ModPackages], add ModPackages=CustomGameTypes to have something similar to this:
[ModPackages]
ModPackages=CustomGameTypes
ModPackagesInPath=..\..\ROGame\Src
ModOutputDir=..\..\ROGame\Unpublished\CookedPC\Script
- Open the SDK, and load the map CTF-Prototype, located under Documents\Unpublished\CookedPC\Maps\Prototype (optional).
Update
- Backup the ROGame folder under Documents\My Games\RedOrchestra2.
- Delete source code located at Documents\My Games\RedOrchestra2\ROGame\Src.
- Extract the CustomGameTypes_Modder_x_y_z archive to Documents\My Games\RedOrchestra2. When prompted to merge folders, click YES. Make sure you don't extract the ROGame folder inside ROGame.
- For each CTF map you have:
- Open the map.
- Clear the error message.
- Play the map, make sure CTF works well.
- Save the map.
Release
The map release process is critical, and must be followed carefully to ensure compatibility between maps.
Cooking
- Extract the latest CTF archive CustomGameTypes_Modder_x_y_z (again).
- Launch a command prompt.
- Execute these commands (change the values assigned to SteamDir and MapName in the first two commands in green, as necessary).
set SteamDir=C:\Program Files (x86)\Steam
set MapName=CTF-Prototype
"%SteamDir%\SteamApps\common\red orchestra 2\Binaries\Win64\ROGame.exe" CookPackages %MapName% -platform=PC -MapsOnly -UpdateInisAuto
"%SteamDir%\SteamApps\common\red orchestra 2\Binaries\Win64\ROGame.exe" CookPackages %MapName% -platform=PCServer -MapsOnly -UpdateInisAuto
Packaging
DO NOT DISTRIBUTE THE CTF FILES THAT YOU HAVE COOKED, INCLUDE THOSE PROVIDED IN THE CORRESPONDING ORIGINAL CTF PACKAGES (SERVER, REDIRECT OR WORKSHOP). FAILURE TO DO SO MIGHT RESULT IN OTHER MAPS BECOMING INCOMPATIBLE.
Note: The map CTF-Prototype doesn't need to be included.
Custom Map Objects
Although the gametype is consituted of many classes, most of them are used internally, and not used by the mapper. This section describes only the objects used by the mapper to implement CTF on his map.
Placeable Actors
- CGTAlliedFlag/CGTAxisFlag: Allied/Axis versions of the flag (and pole). The actor is attached to the back of the flag carrier when touched by him the first time and dropped on the ground when he dies. A new instance is created at the home location every time the flag is captured, dropped and expired/returned.
- CGTFlagStand: Lower part of the flag pole. This actor is not attached to the flag carrier. It acts as a standard visual cue as to where the capture zone is.
- CGTCameraActorViewpoint: Custom camera with team-index filters. When cycling through the list of viewpoints, the player will/won't be able to see through those cameras if the filter defined by the mapper allows him to.
- CGTPathNode: Defines routes to other CGTPathNode actors, going forward or backward. This actor is used by bot to navigate on the map. This actor uses a CGTVolumePathNodeZone volume to define its boundaries and gather sub nodes.
- CGTPathSubNode: Each CGTPathNode has a collection of CGTPathSubNode actors. When the AI navigation tells the bot to move to a path node, it will randomly pick one of the CGTPathSubNode actors associated with the path node to define the target location.
Volumes
- CGTAdvancedTriggerVolume: This volume is a ROTriggerVolume. It has Touch/Untouch events. This volume is used to define the hot zones, the flag capture zones, and the control zones for dynamic spawning areas.
- CGTVolumeNoFlag: This volume is a CGTAdvancedTriggerVolume. If the flag carrier enters such a volume, the flag automatically returns after a delay expires.
- CGTVolumePlayerStartGroup: This volume is a ROVolumePlayerStartGroup. It is used by spawn zone controllers.
- CGTVolumeSpawnProtectionCTF: This volume is a ROVolumeSpawnProtection. If the flag carrier enters such a volume, the flag automatically returns after a delay expires.
- CGTVolumePathNodeZone: The volume is assigned to a path node, and defined its boundaries. The path node will use any CGTPathSubNode actor located inside the volume.
Kismet
- CGTSeqAct_GameManagerCTF: Used to assign the flags, flag zones, and hot zones to the internal game type controller. There should not be more than one instance of this object per map.
- CGTSeqAct_SpawnZoneController: Used to dynamically control a spawn zone. Conditions can be defined, based on the number of enemy or friendly players (or their ratio) in a control zone, to define whether a spawn zone should be enabled or not.
Custom Map Info
For a CTF map, a Map Info of type CGTMapInfoCTF must be used.
- Reinforcements are not used.
- Since the duration of a CTF round is not defined by the mapper, the number of strikes per round cannot be used. Instead, the parameters <Allies/Axis><Mortar/Artillery/Rocket>StrikePeriod are used to define the period between strikes.
- There are many fields under the credits category. The credits are displayed at the bottom-left of the round start screen.
Tutorial
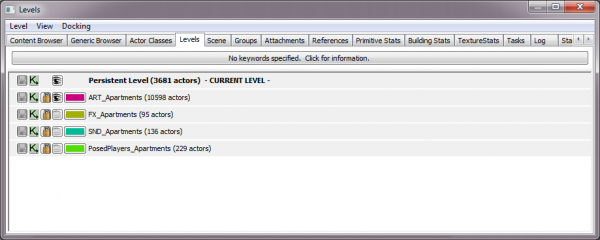
Stock maps use level streaming. That means that most of the effects, sounds and art are located in independent files (e.g. FX-Apartments, SND-Apartments and ART-Apartments). If one change is made to these, any map that use them will have the changes. Top level files (e.g.: TE-Apartments, CD-Apartments and FF-Apartments) should only contain gametype-specific map data. Note that it might not be a good idea to use streaming for a custom map, since the streamed files may not be downloaded.
Before even thinking about CTF, you need a map that makes sense.
- The first option is to build a map from scratch. It is the most flexible, but the slowest approach. You will have to build a terrain, add static or skeletal meshes, effects, sounds, everything. Once done, go to the Basic Setup section.
- The second option is to reuse stock sublevels, and stream them into a new top-level map. Although this approach takes much less time than creating a map from scratch, you will have to place all of the cover nodes, pathing actors, etc. You will build over a fixed art sublevel, which means you cannot move most of the static meshes, cannot modify them. However you can add any new content to your top-level map. Players will only download the top-level map, but any changes made by TWI to the sublevels will affect your final result.
- The third option is to turn a stock map into a non-streamed map. The operation consists of a massive copy-paste operation. For instance, you could start with the art sublevel, and rename it to something else. You would then copy everything from the sound, effects, and top-level maps. The advantage of this approach is that you are independent from the sublevels, which can be modified anytime by TWI, and you can move content around, change the terrain, etc. The downside is that your map will be ~200 MBs, and will take time to download. Also, copy-pasting can take quite some time, since the SDK seems very sensitive to those operations, and crashes often.
- The fourth option consists to copy a stock top-level map, and rename it. Then all you need to do is to delete unused content. The download size will be very small, but you are vulnerable to changes from TWI and the ART file cannot be modified. However, this approach is the fastest. It is also possible to turn the map into a non-streamed map later on.
Cleaning up a copied stock top-level map file
If you are streaming stock sublevels into a copy of an existing stock top-level file (option #4 above), you need to make some cleanup. Go to the Levels window. Hide and lock all of the stock streamed levels by toggling the visibility and lock button of each sublevel. Make sure you leave the top level visible and unlocked. If all groups are visible, and all visibility options are on, you should see everything that is contained in your top-level file only.
Cleanup Kismet
Open Kismet. If you are unfamiliar with Kismet, you should go through some Kismet tutorials, or play around with it until you understand how it works. You need to do some cleanup. Now, what to keep, and what not to keep, that is the question. I suggest the following scheme:
- KEEP
- Logic that triggers the recon planes;
- Logic that enable radios;
- One LevelLoaded block.
- REMOVE
- TE Objectives logic;
- All CD/FF logic.
Cleanup Editor
Once the cleanup of Kismet complete, it is time to clean volumes, actors, and such. To quickly select multiple actors, open the Scene window, select PersistentLevel, enter the actor type in the Filter Text field and press enter. You can select multiple actors by clicking the first, holding shift, and clicking the last one. Then you can edit/delete multiple actors at a time. I suggest the following scheme:
- KEEP
- Actors:
- Pylon;
- ROCoverLink;
- ROMantleMarker;
- Volumes:
- BlockingVolume;
- LightMass;
- NavMeshBoundsVolume;
- PathBlockingVolume;
- ROVolumeAmmoResuply;
- ROVolumeMapBounds (Not to be confused with MapBoundary volumes, which define Out of combat zone areas.)
- Actors:
- REMOVE
- Actors:
- Camera;
- Note;
- RallyNode;
- ROCameraActorViewpoint;
- ROObjective;
- ROPlayerStart;
- ROSpawnCameraActor.
- Volumes:
- ROPlaceableVolume;
- ROVolumePlayerStartGroup;
- ROVolumeSpawnProtection;
- ROVolumeMapBoundary;
- ROVolumeNoArtillery.
- Actors:
Basic Setup
Kismet - CTFManager
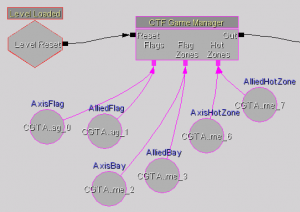
In Kismet, add a CTF Game Manager (right-click and look under New Actions/Custom Game Types). Link the output signal Reset of a LevelLoaded block to the input of the manager.
Position the flags
In the Actor Classes window, select CGTFlagStand under Actor. Right-click on the map, and click Add CGTFlagStand Here. The translation widget appears at the bottom of the flag stand. Open the properties window of the stand. Round each component of the location (XYZ). Otherwise, the flag may not reposition exactly at the correct location due to floating point rounding errors. Take note of the XYZ location of the stand. In the Actor Classes window, select CGTAlliedFlag (or CGTAxisFlag) under Actor/CGTFlag. The flag might appear underground, since the widget is positioned at the tip of the flag pole. Open the properties window of the flag. Set the same location coordinates as those of the stand for X and Y, but add 90 units the Z coordinate of the stand. Select the flag (not the stand). Open Kismet, right-click to open the context menu, and click New Object Var Using CGTAlliedFlag_X. Link the circle to the Flags variable of the CTF Game Manager. Repeat for the other stand/flag.
Note: Do not use more than 4-5 significative numbers in the XYZ components of the location (e.g. X=25412.222 should be changed to 25410.000). Otherwise, for large values, when the flag is returned home, it could slightly be offset because the engine will not use all of the digits.
Define the capture zones
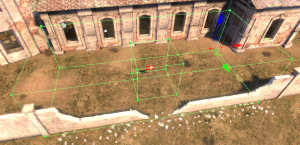
Using the builder brush, define a box with the Allied flag in the middle. A large box will make it very easy to capture the flag, while a smaller box will require that the flag carrier gets closer to his own flag. Once the builder brush is correctly positioned, add a volume of type CGTAdvancedTriggerVolume. Move the builder brush away, and select the volume you created. Open the Properties window, and assign the team index (0 for the Axis base, 1 for the Allied base). With the volume still selected, open Kismet. Right-click to open the context menu, and click New Object Var Using CGTAdvancedTriggerVolume_X. You might want to add a comment or variable name to that circle. Link the circle to the Flag Zones variable of the CTF Game Manager. Repeat for the other flag.
Define the initial spawn zones
I won't go in details here: define spawn zones like you would do on any TE/CD/FF map. The only difference, is that the volume that you will use, will be a CGTVolumePlayerStartGroup. Assign the TeamIndex property of the volume (0 for the Axis, 1 for the Allies).
Setup the WorldInfo
Open the WorldInfo window. Under the WorldInfo category, go to Game Type for PIE. Select CGTGameInfoCTF. Now go under MyMapInfo. Click the blue arrow to the right, and select CGTMapInfoCTF. Under TerritoriesAllies/TerritoriesAxis, define the Allies/Axis squads as usual. Under ROMapInfo, define the Overhead Map Texture.
First launch
From what you have done so far, you should be able to launch PIE and play CTF. Before going any further, try it out. Here's the common bugs you may encounter:
- Nothing happens when you touch the enemy flag because you didn't define the capture zones properly, or didn't link the flags and/or the zones to the CTF Game Manager.
- The game launches, but after selecting a team, nothing happens: the PIE gametype is not defined properly.
- The game ends abruptly after a round start: the TimeLimit is not defined properly in ROGame.ini.
- The HUD disappears when you open the map: you didn't define the Overhead Map Texture.
Advanced Features
Pathing System
The CTF Pathing System uses objects of these types:
Actors/Volumes
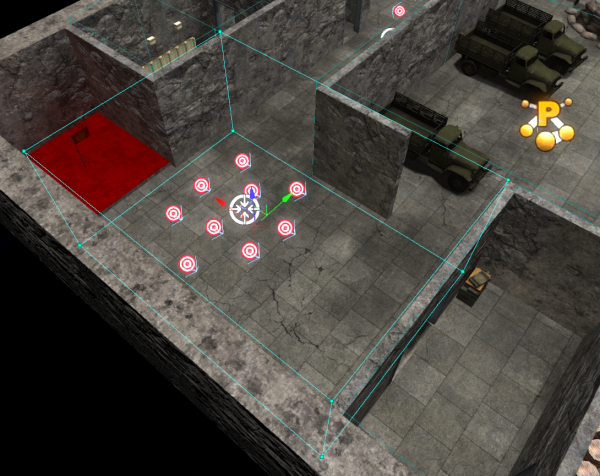
Pylon
Pylons work the same way they do in the stock RO2 pathing system. Basically, they are used to calculate pathing meshes over areas defined by the mapper. You need to define them like you would do an any other map (TE, CD or FF).
CGTPathNode
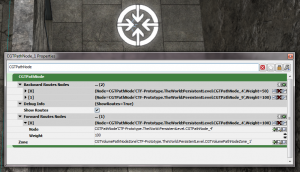
In the stock pathing system, bots pick a location somewhere inside the rally node radius, as an intermediate location between its current location, and the objective.
Path nodes look like rally nodes. In fact, they have the same icon. However, they are different.
Path nodes do not have a radius: they have a volume of type CGTVolumePathNodeZone. The volume has two purposes:
- It allows bots to know when they are within the perimeter of a path node.
- The CGTPathSubNodes actors within the volume will be associated to the corresponding path node when the map loads.
Path nodes define routes to the next path nodes. There are two types of routes, the routes leading forward ('forward' is a generic term used by CTF for routes that lead to the Allied flag) and routes leading backward ('backward' is a generic term used by CTF for routes that lead to the Axis flag). More specifically, a path node has two arrays: an array of adjacent path nodes leading forward (Allied flag), and another one for adjacent path nodes leading backward (Axix flag). The mapper defines the routes.
Path nodes don't have a weight: routes have a weight. It allows to make each route independent from the other. If the weight was on the path node, any route leading to that path node would be affected.
Path nodes use the CGTPathSubNode actors defined within their associated volume to give navigation instructions to the bots. In other words, bots do not navigate to a path node, they navigate to one (random) of its sub nodes.
Lets get into the shoes of a bot for a moment.
- My name is Aleksei, I'm a Russian soldier. I just spawned. The command management system tells me that I need to get the Axis flag. I use the navigation mesh that has been calculated thanks to the Pylons, and I calculate a direct path leading to the Axis flag.
- I walk a 2 meters, then get a notification: I entered the perimeter of CGTPathNode_1. I am navigating backward (Axis Flag). CGTPathNode_1 contains two routes leading backward. The first route (A) has a weight of 100, and the second one (B) has a weight of 50. I use my super dice, that has 150 faces (100 faces with route A, and 50 faces with route B). I throw a dice, and I obtain 'A'. Looks like I just picked the first route. CGTPathNode_2 is associated with this route. CGTPathNode_2 has 10 CGTPathSubNode actors within its perimeter. I randomly pick CGTPathSubNode_7. I calculate a direct path leading to CGTPathSubNode_7.
- I walk 21 meters, then I get a notification: I entered the perimeter of CGTPathNode_2. I don't need to do anything, I'll just continue until I reach CGTPathSubNode_7.
- I walk 6 meters, and I reach CGTPathSubNode_7. My current path node is CGTPathNode_2. It has two routes leading backward. The first route (C) has a weight of 100, and the second one (D) also. I randomly pick route C. CGTPathNode_4 is associated with this route. CGTPathNode_4 has 6 CGTPathSubNode actors within its perimeter. I randomly pick CGTPathSubNode_24. I calculate a direct path leading to CGTPathSubNode_24.
- I walk 33 meters, then I get a notification, I entered the perimeter of CGTPathNode_4. Nothing to do, I need to reach CGTPathSubNode_24.
- I walk 9 meters, and I reach CGTPathSubNode_24. My current path node is CGTPathNode_4. It has no route leading backward. From my current location, I calculate a direct path to the Axis flag.
- I walk 16 meters, and I take the flag. The command management system tells me that I need to take the flag home. I calculate a direct path to my base.
- I walk 4 meters, then I get a notification, I entered the perimeter of CGTPathNode_4. It contains three routes leading forward. According to the weights, I pick the first route. CGTPathNode_6 is associated to that route. I pick one of its subnodes, CGTPathSubNode_30. I calculate a direct path to CGTPathSubNode_30.
- I walk 41 meters and I am notified that I enter the perimeter of CGTPathNode_6. Nothing to do.
- I walk 9 meters, and I reach CGTPathSubNode_30. CGTPathNode_6 has no route leading forward. I calculate a direct path to my base.
- I walk 12 meters, and get shot, 1 meter away from my flag bay. Too bad, all that work for nothing! Better luck next time Aleksei.
To summarize:
- When a bot doesn't have a path node, it goes directly to its objective. If it enters the perimeter of a path node, it will pick one of its routes, and navigate to one of its subnodes.
- When the subnode is reached, the bot uses its current node to calculate the next one. A subnode of the 'next node' is then used to determine the next move.
- When no route is available, the bot navigates directly to its objective.
CGTPathSubNode
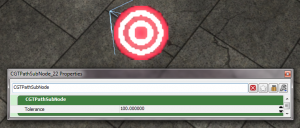
When those actors are within the perimeter of a CGTPathNode, they are automatically associated with them. A bot that will pick one of them as a navigation target. CGTPathSubNode have a radius (Tolerance). The radius is small, and prevent bots from having to reach the EXACT location of the sub node. Instead, as soon as they are within the specified radius, the consider that they reached the sub node.
CGTVolumePathNodeZone
This is the volume that defines the boundaries of a path node.
Process
- Add CGTPathNode actors.
- For each path node:
- Add a volume of type CGTVolumePathNodeZone.
- Assign the volume to the property of the node.
- Add CGTPathSubNode actors within the volume at the locations you want the bots to go.
- Once the path nodes created, you need to create the routes. For each path node:
- For each route it supports:
- Create an entry in its list (forward for Allies base and backward for routes leading to Axis base).
- Assign the path node.
- Set the weight of the route.
- For each route it supports:
Tip: Use the 'lock' button in the properties page.
Debugging
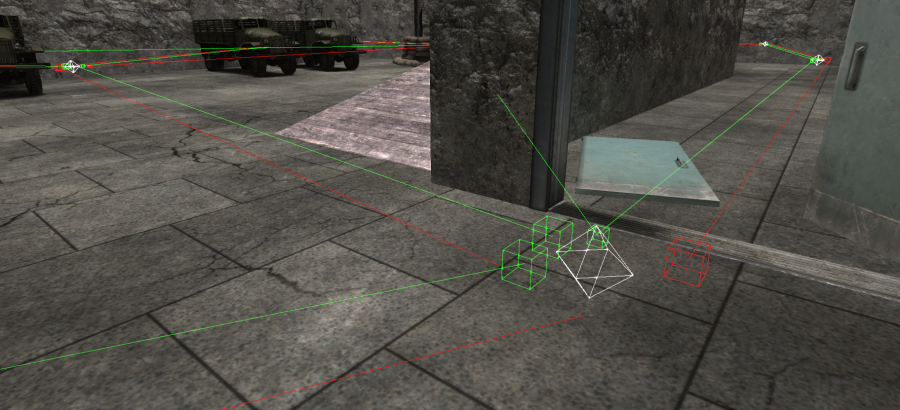
Unfortunately, the routes are not displayed in the editor. CGTPathNode actors have a parameter ShowRoutes. When this parameter is checked, routes will be drawn when playing. CGTPathNode will be displayed by a white diamond. Routes forward appear as green lines, and routes backward appear as red lines. The beginning of a route has a box. The size of the box corresponds to the weight of the route.
Dynamic Spawn Zones
A dynamic spawn zone is defined in Kismet by a Spawn Zone Controller. A controller has a Reset input, that must be triggered when the level is loaded. Controllers have 4 parameters:
- Team Index
- Priority
- Condition
- Spawn Zones (array)

Behavior
After each reinforcement wave, a manager will search for Spawn Zone Controllers that have a Team Index that corresponds to the team that has just been reinforced. The controllers are sorted by priority. Controllers will be processed from the controller with the highest priority value to the controller with the lowest priority value.
Spawn Zone Controller Processing
When a Controller is processed, it will evaluate its Condition. If the condition returns true, it will assign its Team Index to each Spawn Zone, and enable it. If the condition returns false, for each of its Spawn Zones, if the Spawn Zone is currently owned (the Team Index of the Spawn Zone equals the Team Index of the Controller), it will disable it.
Conditions
There are many conditions and each condition has different parameters. Only one parameter is common to all conditions: Invert. When checked, a condition that would have returned true will return false, or vice-versa.
CGTLogicZone
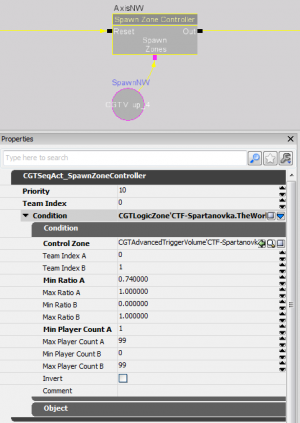
This logic condition has the following parameters:
- Control Zone: Volume of type CGTAdvancedTriggerVolume, used to calculate the forces (soldiers, not physics).
- Team Index A: Team Index associated with the 'generic' team 'A'.
- Team Index B: Team Index associated with the 'generic' team 'B'.
- Min Ratio A: Minimum forces ratio that Team A can have in the control zone.
- Max Ratio A: Maximum forces ratio that Team A can have in the control zone.
- Min Ratio B: Minimum forces ratio that Team B can have in the control zone.
- Max Ratio B: Maximum forces ratio that Team B can have in the control zone.
- Min Player Count A: Minimum number of soldiers that Team A must have in the control zone.
- Max Player Count A: Maximum number of soldiers that Team A must have in the control zone.
- Min Player Count B: Minimum number of soldiers that Team B must have in the control zone.
- Max Player Count B: Maximum number of soldiers that Team B must have in the control zone.
When the condition is evaluated, the number of players of team A and B in the Control Volume and their ratio are calculated. If those values are within the parameters specified, the condition returns true. Otherwise it returns false.
CGTLogicOwnership
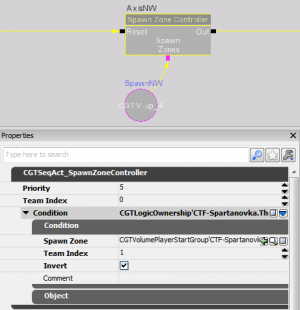
This logic condition has the following parameters:
- Spawn Zone: Volume of type CGTVolumePlayerStartGroup, that is verified for ownership.
- Team Index: Index of the team that must be using the spawn zone.
When the condition is evaluated, it looks for the primary ROPlayerStart actors within the Spawn Zone. If all of them have a Team Index equal to the Team Index parameter, and are enabled, the condition returns true. Otherwise it returns false.
CGTLogicOR
This logic condition is simply an array of conditions (subconditions). If at least one of the subconditions returns true, the condition returns true. Otherwise it returns false. Subconditions can be of any condition type, including CGTLogicOR.
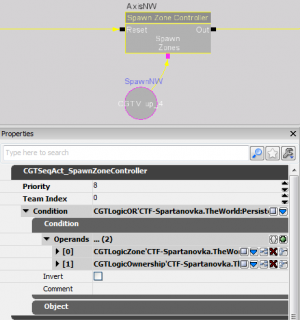
CGTLogicAND
This logic condition is simply an array of conditions (subconditions). If all the subconditions return true, the condition returns true. Otherwise it returns false. Subconditions can be of any condition type, including CGTLogicAND.
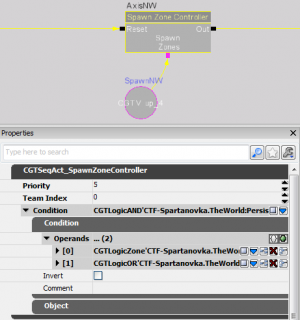
Hot Zones

A hot zone is a volume that gives bonus points for attacking/defending a flag bay. Generally, only one hot zone is defined around the flag bay, but many zones can be defined. To define a hot zone:
- Create a volume of type CGTAdvancedTriggerVolume.
- Set the 'TeamIndex' attribute of the volume (0 for the Axis, 1 for the Allies).
- Open Kismet, right-click to open the context menu, and click New Object Var Using CGTAdvancedTriggerVolume_X.
- Link the variable to the Hot Zones connector of the CTF Game Manager block.
Cameras
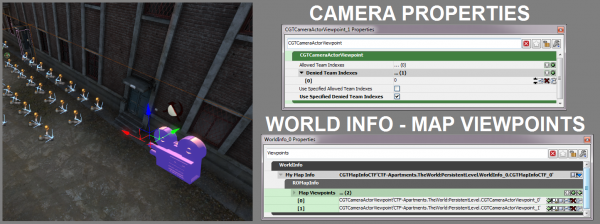
CTF does not allow roaming or 1st and 3rd person spectating when dead. As a result, it is essential to define cameras that won't reveal the action going on the map, and eventually the location of the flag carriers. An actor has been defined for that purpose: CGTCameraActorViewpoint. Setup the camera following this procedure.
- Insert a CGTCameraActorViewpoint actor on the map.
- Position the camera (tip: Right-Click on it and hit Snap View to Actor, then click Lock Selected Actors to Camera in the buttons at the top of your viewport).
- Open the properties of the camera.
- Under Denied Team Indexes, add the index of the teams that (0 for the Axis, 1 for the Allies) you want to prevent from looking at the camera.
- Check Use Specified Denied Team Indexes.
- Open World Properties under the View menu.
- Add your camera actor under Map Viewpoints.
No Flag Area
Flag carriers cannot enter spawn protected zones. However, if for any reason, you need to prevent flag carriers from entering any zone that is available to the normal players, use a volume of type CGTVolumeNoFlag.
Credits
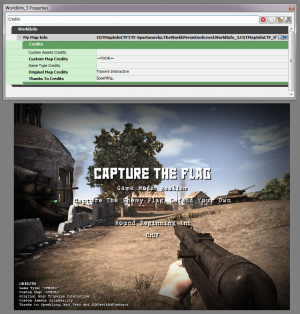
In the MapInfo, you will find a Credits Category. Informations entered in this block are displayed at the bottom-left corner of the Round Start screen.
- Custom Assets Credits: Anyone who contributes to custom assets found on this map should appear here. GrimReality (name of the artist who provided the CTF flags meshes and textures) will appear to the right of whatever is entered into this box.
- Custom Map Credits: This field should contain the name of the mapper that created this map, when an original map has been customized. This field is not displayed if left empty.
- Game Type Credits: The modders that created the GameType should have their name here. -=THOR=- (CTF Modder) will appear to the left of whatever is entered into this field.
- Original Map Credits: The original author of the map should be here. This field should never be left empty: either a map is derived from an original map, either it is an original creation.
- Thanks To Credits: Any other Thanks should be included here. Mad_Fred (name of the modder that helped testing and defining many CTF features) and |DD|DeathB4Dishonor (clan who helped in the beta phase of the project) will appear to the right of whatever is entered into this field.
As a convention, each name should be separated by a comma followed by a space, except for the last two names, which should be separated by a space, the and word, and a space.